
Rampage L4-135 2.2L (1983)
Brake Shoe: Service and Repair
Models W/9, 10 & 11 Inch Drums
Removal
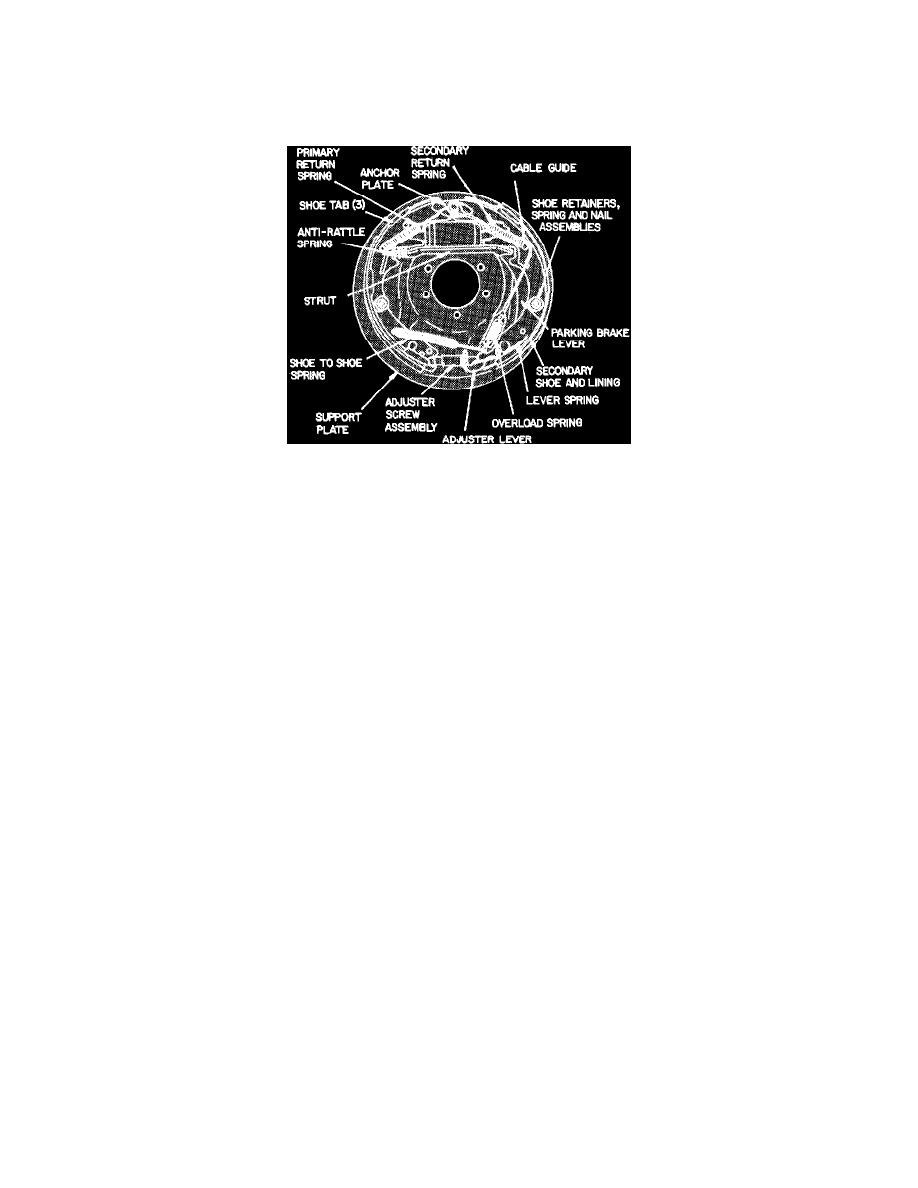
Fig. 1 Drum brake assembly. Models w/9, 10 & 11 inch drums
1.
Raise and support rear of vehicle, then remove tire and wheel assembly.
2.
Remove brake drum. If brake lining is dragging on brake drum, back off brake adjustment by rotating adjustment screw. If brake drum is rusted
or corroded to axle flange and cannot be removed, lightly tap axle flange to drum mounting surface with a suitable hammer.
3.
Using brake spring pliers or equivalent, remove primary and secondary shoe return springs.
4.
Remove automatic adjuster cable from anchor plate, then unhook from adjuster lever.
5.
Remove adjuster cable, overload spring, cable guide and anchor plate.
6.
Unhook adjuster lever spring from lever, then remove spring and lever.
7.
Remove shoe to shoe spring from secondary shoe web, then primary shoe.
8.
Spread shoes apart and remove parking brake strut and spring.
9.
Using suitable tool, remove shoe retainers, then springs and nails.
10.
Disconnect parking brake cable from lever, then remove brake shoes.
11.
Remove parking brake lever from secondary shoe.
12.
Clean dirt from brake drum, backing plate and all other components. Do not use compressed air or dry brush to clean brake parts. Many
brake parts contain asbestos fibers which, if inhaled, can cause serious injury. To clean brake parts, use a water soaked rag or a suitable
vacuum cleaner to minimize airborne dust.
Installation
1.
Lubricate parking brake lever fulcrum with suitable brake lube, then attach lever to secondary brake shoe. Ensure lever operates smoothly.
2.
Lightly lubricate backing plate shoe contact surfaces with suitable brake lube.
3.
Connect parking brake lever to cable, then slide secondary brake shoe into position.
4.
Connect wheel cylinder link to brake shoe (if equipped).
5.
Slide parking brake lever strut behind axle flange and into parking brake lever slot, then place parking brake anti-rattle spring over strut.
6.
Position primary brake shoe on backing plate, then connect wheel cylinder link (if equipped) and parking brake strut.
7.
Install anchor plate, then position adjuster cable eye over anchor pin.
8.
Install primary shoe return spring using brake spring pliers or equivalent.
9.
Place protruding hole rim of cable guide in secondary shoe web hole, then holding guide in position, install secondary shoe return spring through
cable guide and secondary shoe. Install spring on anchor pin using brake spring pliers or equivalent. Ensure cable guide remains flat against
secondary shoe web during and after return spring installation. Also ensure secondary spring end overlaps primary spring end on anchor
pin.
10.
Using suitable pliers, squeeze spring ends around anchor pin until parallel.
11.
Install adjuster screw assembly between primary and secondary brake shoes with star wheel on secondary shoe side. The left side adjuster
assembly stud is stamped "L" and is cadmium-plated. The right side adjuster assembly is stamped "R" and is colored black.
12.
Install shoe to shoe spring, then position adjusting lever spring over pivot pin on shoe web.
13.
Install adjusting lever under spring and over pivot pin, then slide lever slightly rearward.
14.
Install nails, springs and retainers.