
Rampage L4-135 2.2L (1983)
1. Align breather tube with previously made marks on housing, then install grommet so tabs lock.
2. Install new piston ring on rack, position seal protector No. C-4666 over rack teeth and slide seal with lip facing piston onto rack.
3. Remove seal protector and bottom the seal on rack piston, slide plastic retaining ring on rack onto seal. Slide rack, seal and piston ring into
housing, using caution not to rip or deform ring or seal. Tap rack with a rubber hammer to seat seal. Do not attempt to remove upper pinion
bushing.
4. Coat all seals with automatic transmission fluid then, assemble new O-ring onto bulkhead followed by new oil seal using tool No. C-4669.
5. Lubricate and install seat protector tool No. C-4670 over rack threads, slide bulkhead assembly and end lock ring over seal protector, O-ring end
first and insert in rack tube, using caution not to rip or distort the O-ring.
6. Using tool No. C-4675, seat bulkhead in the rack tube. Install retaining wire by rotating bulkhead assembly counterclockwise. Remove protective
tool.
7. Install pinion shaft lower seal using tool No. C-4883. Then using a suitable socket, press in on race of bearing, using caution not to cock bearing.
8. Install seal rings on valve body, if removed.
9. Center rack in housing, then install pinion shaft and valve assembly so that flat on stub shaft will be aligned with mark on housing when assembly
is fully seated.
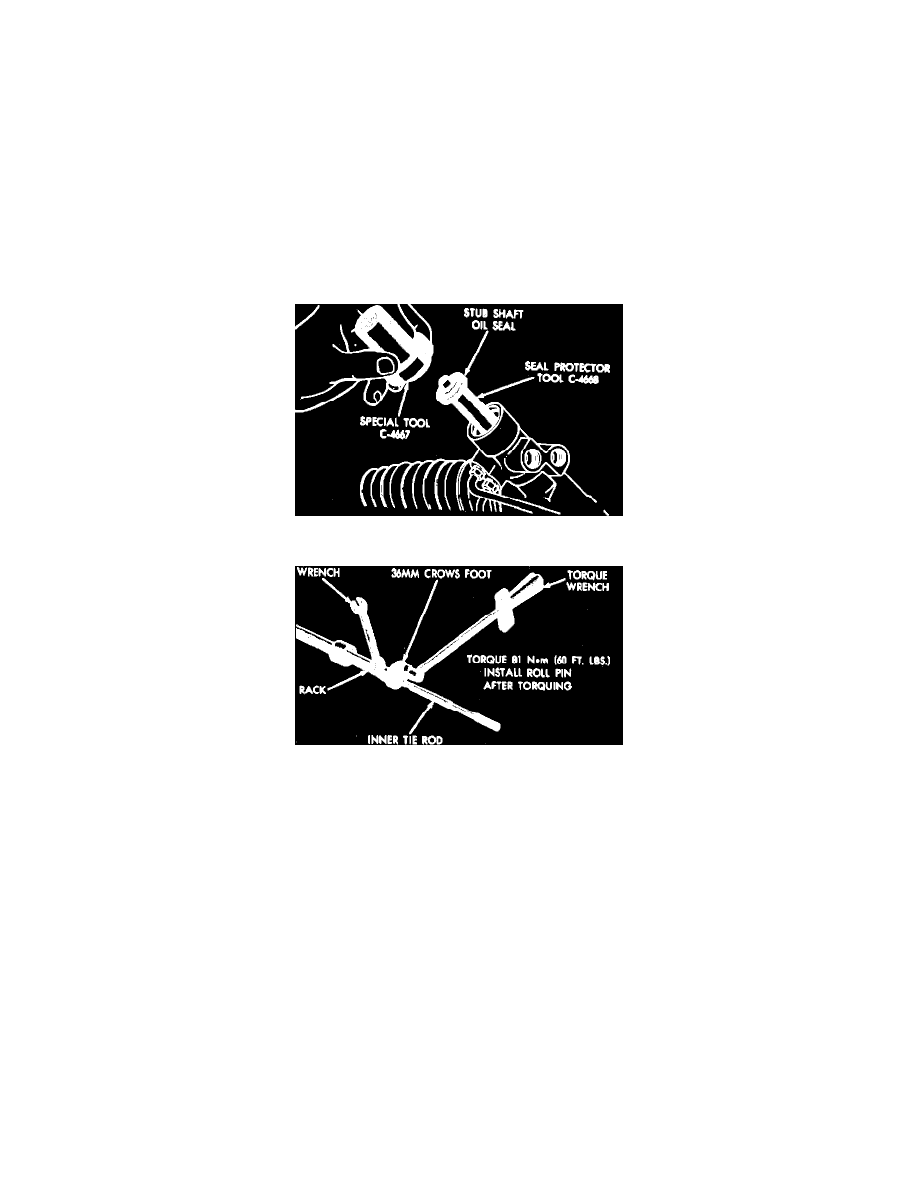
Fig. 13 Stub shaft seal installation
Fig. 14 Torquing inner tie rod pivot
10. Install stub shaft bearing then, position seal protector tool No. C-4668 slide shaft seal over protector into valve housing. Seat seal with tool No.
C-4667 and install retaining snap ring.
11. Install rack bearing, spring and adjuster plug. Turn adjuster plug until it bottoms, then back plug off 40 to 60 degrees. Install locknut and torque to
50 ft. lbs. while holding adjuster plug in position.
12. Install tie rod assembly on rack. While holding rack in position with a wrench torque inner tie rod pivot housing to 60 ft. lbs.. If rack is not held in
position while tightening tie rod housing, damage to the pinion teeth will result.
13. On 1984 - 85 models, install roll pin.
14. On all models, lubricate inner surfaces of bellows with silicone or other suitable lubricant. Align bellows marks made previously with breather
tube and install bellows with boot seal over housing lip with hole in boot aligned with breather tube. Secure inner clamp.
15. Position bellows outer clamp and jam nut on tie rod. Install tie rod end in the position as removed. Torque jam nut to 55 ft. lbs., then install outer
bellows clamp. Ensure bellows is not twisted.