
Air bag ECU - r+r
- Make
- Fiat
- Model
- Multipla Factory Service Manual
- Year
- 1998–2010
- Section
- Special accessories › Air bag ECU - r+r
AIR BAG ECU - R+R
Before removing and refitting the control unit, carry out the following preliminary operations:
- Place the ignition key in the OFF position and extract it;
- Disconnect and insulate the battery leads;
- Wait for 10 minutes before continuing.
FOLLOW ALL THE RECOMMENDED SAFETY FULES ( 5580C air bag system ).
Removing
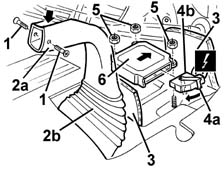
1. Undo the bolts fixing the duct.
2. Move the upper part of the duct (2a) backwards, taking advantage of the cover (2b) area.
3. Lift up the edges of the sound insulating carpet.
4. Rotate the safety bracket (4a) in the direction of the arrow and disconnect the electrical connection (4b).
| Name | Connector | |
|---|---|---|
| 4b | Air bag control unit | M60 |
5. Unscrew the nuts.
6. Remove the control unit.
Refitting
Follow these precautions.
Do not strike the control unit and do not connect the electrical connection to the control unit before having fixed the control unit correctly. Make sure that the battery is disconnected.
If the control unit is being replaced, remove the removable part of the adhesive label from the new control unit and place it in a special file containing the vehicle details (model, registration date, chassis number) and the serial number of the old control unit. This file should be kept for future checks.
1. Position the control unit (1a).
Make sure that the arrow (1b) on the upper surface of the control unit is pointing in the direction of travel.
2. Tighten the nuts to the recommended torque.
| Fastening | Component | Ø | Value (daNm) | |
|---|---|---|---|---|
| 2 | Nut | AIR BAG CONTROL UNIT | M6 | 0.7 - 1.1 |
3. Connect the electrical connection (3a) and secure it by rotating the safety bracket (3b) in the direction of the arrow.
4. Reposition the edges of the sound insulation carpet.
5. Move the top part of the duct (5a) forwards, taking advantage of the cover (5b) area.
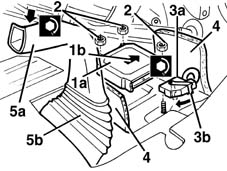
Fasten the duct using the bolts.
Connect the battery.
Check the operation of the system using the Examiner or another tester.
Before removing and refitting the control unit, carry out the following preliminary operations. Before removing and refitting the Air Bag module, the following preliminary operations must be carried out. - Disconnect the battery leads and insulate. - Wait for 10 minutes before continuing.
FOLLOW ALL THE RECOMMENDED SAFETY FULES ( 5580C air bag system ).
Removing
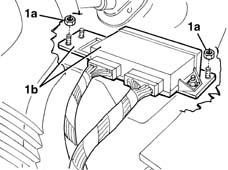
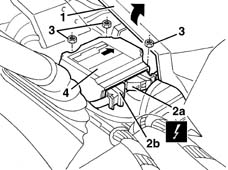
1. Undo the nuts (1a) and move the multi-services control unit and support (1b).
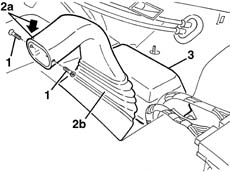
1. Undo the bolts fixing the duct.
2. Move the upper part of the duct (2a) backwards, taking advantage of the cover (2b) area.
3. Remove the protection
1. Lift up the edge of the sound insulating carpet.
2. Disconnect the electrical connections (2a (2b).
| Name | Connector | |
|---|---|---|
| 2a | Air bag control unit | M60A |
| Name | Connector | |
|---|---|---|
| 2b | Air bag control unit | M60B |
3. Unscrew the nuts.
4. Remove the control unit.
Refitting
Follow these precautions.
never strike or shake the control unit; do not connect the electrical connection to the control unit before having fixed the control unit correctly; Make sure that the battery is disconnected.
If the control unit is being replaced, remove the removable part of the adhesive label from the new control unit and place it in a special file containing the vehicle details (model, registration date, chassis number) and the serial number of the old control unit. This file should be kept for future checks.
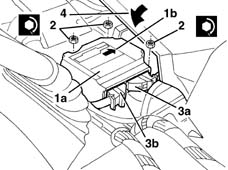
1. Position the control unit (1a). Make sure that the arrow (1b) on the upper surface of the control unit is pointing in the direction of travel.
2. Tighten the nuts to the recommended torque.
| Fastening | Component | Ø | Value (daNm) | |
|---|---|---|---|---|
| 2 | Nut | AIR BAG CONTROL UNIT | M6 | 08 |
3. Connect the electrical connections (3a, 3b).
4. Reposition the edge of the sound insulation carpet.
Place the protection in position.
Move the top part of the duct forwards, taking advantage of the cover area.
Tighten the shroud retaining bolts.
Place the multi-services control unit and support in position and tighten the nuts.
Connect the battery.
Check the operation of the system using the Examiner or another tester.
Parts & tools for this job For 1998 Fiat Multipla
- TOOLOBD2 scanner with SRSSearch: OBD2 scanner ABS SRS
- TOOLTrim removal tool kitSearch: trim removal tool kit
Links open Amazon search results in a new tab. As an Amazon Associate I earn from qualifying purchases.