
F 250 4WD Pickup V8-7.3L DSL Turbo VIN K (1994)
Oil Seal Removal
7. Using an arbor press and a suitable spacer 104.78mm (4-1/8-inch) diameter. remove rear oil seal.
8. If rear cover seal fails repeatedly, check rear cover bore concentricity as follows:
a. Install rear cover to engine with oil seal removed.
b. Mount a dial Indicator (on swivel joint) onto the crankshaft flange. Position the dial indicator press against the Inside diameter of the rear
cover seal bore.
c. Measure at four equally spaced locations.
d. Rear cover seal bore will be connected to the crankshaft centerline in accordance with specifications.
e. Replace rear cover if not within 0.05mm (0.020 inch).
INSTALLATION
NOTE: When applying Silicone Rubber Sealant DOAZ-19502-BA (ESB-M4G92-A) or equivalent always use the bead size specified and join the
components within 15 minutes of application. After 15 minutes the sealant begins to set up and sealing effectiveness may be reduced.
1. Clean rear cover and engine block gasket surfaces.
2. Remove old RTV, sealant from oil pan to rear cover sealing surface on oil pan. clean sealing surfaces with a suitable solvent, and dry thoroughly.
3. Coat rear engine cover seal bore Inside diameter with Gasket and Trim Adhesive D7AZ-19B508-AA (ESR-M11P17-A) or equivalent.
NOTE: Seal must be installed from the engine block side of rear cover flush with seal bore Inner surface.
4. Use an arbor press and Rear Crankshaft Seal Replacer T83T-701-A to Install new rear main oil seal.
5. Apply a 3.2mm (1/8-inch) bead of Silicone Rubber Sealant D6AZ-19S62-A (ESB-M4G92-A) or equivalent around the outside diameter of the
rear seal and the edge of the rear cover.
6. Install Rear Crankshaft Seal Pilot tool T83T-6701-A onto crankshaft.
7. Apply Gasket and Trim Adhesive D7AZ-19B6O-AA (ESB-M11P17-A) or equivalent to engine block and rear cover gasket surfaces.
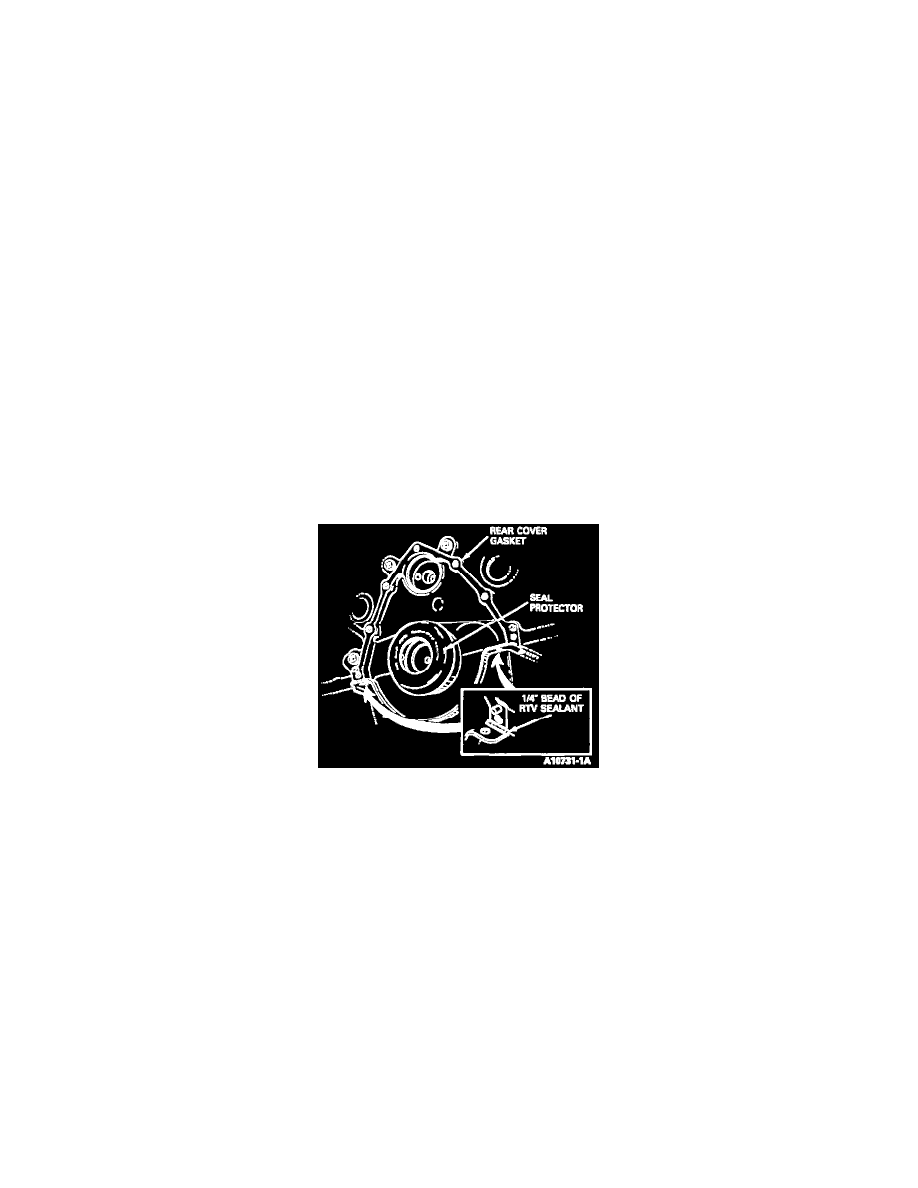
Rear Engine Cover Gasket
8. Install rear cover gasket to engine block.
NOTE: The dual mass flywheel may create an objectionable noise or vibration. Install new flywheel bolts with pre-applied adhesive
(E7TZ-6379-B). When installing these bolts for the first time, do not apply additional adhesive to the threads. Each time this new bolt or previous
bolt (without pre-applied adhesive) is removed to service the flywheel, clean the bolt threads and apply Threadlock 262 (E2FZ-19954-B) to the
threads.
9. Apply a 6.35mm (114-inch) bead of Silicone Rubber Sealant D6AZ-19562-A (ESB-M4G92-A) or equivalent at the corners of the oil pan and on
oil pan sealing surface.
10. Push rear cover into position on engine block and Install attaching bolts. Remove Seal Pilot T83T-701-B.
11. Position flywheel on crankshaft flange. Coat threads of flywheel attaching bolts with Perfect Seal Sealing Compound B5A-1955-A
(ESE-M4G115-A) or equivalent and Install spacer, bolts and washers (manual transmission only). Tighten all bolts to 64 Nm (47 ft-lb),
alternating across from each other. Retighten bolts an additional 45°, alternating across from each other.
12. Install clutch.
13. Install transmission
14. Install exhaust charge pipe. Install bolts retaining exhaust charge pipe to intermediate pipe.
15. Lower vehicle.
16. Install Mormon clamp at turbocharger wastegate housing.
17. Run engine and check for oil leaks.