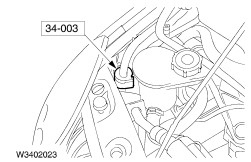
| Removal and Installation Special Tool(s) | | Disconnecting tool, refrigerant line 5/8" (black) 34-003 | Removal | | -
Standard preparatory measures - Make a note of the radio keycode.
- Make a note of the preset radio stations.
- Place protective covers over the fenders.
| | | -
CAUTION:Disconnect the battery negative lead. | | | -
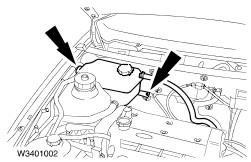
Detach the coolant expansion tank. - Unhook the coolant expansion tank from its bracket.
| | | -
Remove the bulkhead extension. - Unclip the central junction box (CJB) cover.
| | | -
Remove the bulkhead extension (continued). - Remove the bolts.
- Unclip the electrical connector.
| | | -
Remove the bulkhead extension (continued). | | | -
Remove the air conditioning low-pressure switch. | | | -
NOTE:Plug the refrigerant line and the evaporator. Disconnect the refrigerant line at the evaporator. | | | -
NOTE:Seal the refrigerant line and the accumulator/dehydrator with plugs. Disconnect the refrigerant line at the accumulator/dehydrator. | Installation | | -
NOTE:Before connecting the refrigerant lines, fit them with new O-rings. Coat the new O-rings with refrigerant oil before fitting them. Refit the components in reverse order. | | | -
Standard finishing operations. - Connect the battery negative lead.
- Remove the protective covers.
- Reprogramme the preset radio stations.
- Road test the vehicle to collect data for the PCM.
| | | -
Check the operation of the air conditioning system. | | |