| Removal and Installation Name Specification Grease SA-M1C9107-A | | -
Raise and support the vehicle. For additional information, refer to: (100-02 Jacking and Lifting) Jacking (Description and Operation), Lifting (Description and Operation). | 2. Remove the components in the order indicated in the following illustration(s) and table(s). 1 - Heated oxygen sensor (HO2S) electrical connector 6 - Exhaust flexible pipe gaskets 3. To install, reverse the removal procedure. CAUTION:Never use jointing compound forward of the catalytic converter. Removal Details Item 3 : Exhaust flexible pipe to exhaust manifold retaining nuts | | -
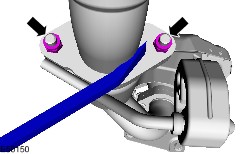
CAUTION:Over bending of the exhaust flexible pipe may cause damage resulting in failure. Support the exhaust flexible pipe with a support wrap or splint. | Item 4 : Exhaust flexible pipe to muffler and tailpipe assembly retaining nuts | | -
CAUTION:Twisting the exhaust flexible pipe more than 2 degrees may cause damage resulting in failure. NOTE:Use a pry-bar to prevent the exhaust flexible pipe from twisting when removing the exhaust flexible pipe to catalytic converter retaining nuts. Remove the exhaust flexible pipe to catalytic converter retaining nuts. | Installation Details Item 4 : Exhaust flexible pipe to muffler and tailpipe assembly retaining nuts | | -
CAUTION:Twisting the exhaust flexible pipe more than 2 degrees may cause damage resulting in failure. NOTE:Use a pry-bar to prevent the exhaust flexible pipe from twisting when installing the exhaust flexible pipe to catalytic converter retaining nuts. Install the exhaust flexible pipe to catalytic converter retaining nuts. | Item 3 : Exhaust flexible pipe to exhaust manifold retaining nuts | | -
CAUTION:Over bending of the exhaust flexible pipe may cause damage resulting in failure. Remove the exhaust flexible pipe support wrap or splint. | |