| Removal and Installation Removal | | -
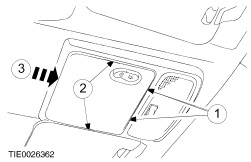
CAUTION:To avoid damage, the overhead console trim panel must only be pulled downwards enough to detach the retaining clips. Detach the overhead console trim panel from the overhead console. - Using a suitable screwdriver, detach the front retaining clips.
- Pull the overhead console trim panel downwards to detach the side retaining clips.
- Push the overhead console trim panel forwards to detach the rear retaining clips.
| | | -
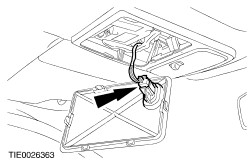
Remove the overhead console trim panel. - Disconnect the power roof opening panel control switch electrical connector.
| | | -
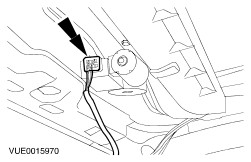
Disconnect the roof opening panel motor electrical connector (headliner shown removed for clarity). | | | -
Remove the roof opening panel motor. | Installation | | -
Remove the roof opening panel guide arm covers. | | | -
CAUTION:The guide pins must be aligned centrally between the lugs as shown. Check the alignment of the left-hand and right-hand cable guide pins (left-hand side shown). | | | -
Adjust the left-hand cable guide pin. - Using a suitable screwdriver, move the cable in the direction required
| | | -
Adjust the right-hand cable guide pin. - Using a suitable screwdriver, move the cable in the direction required.
| | | -
Install the roof opening panel guide arm covers | | | -
Connect the roof opening panel motor electrical connector (headliner shown removed for clarity). | | | -
Connect the roof opening panel motor control switch electrical connector. | | | -
CAUTION:This step must be carried out if re-installing a previously used roof opening panel motor. NOTE:This step is not necessary when installing a new roof opening panel motor. | | | -
Install the roof opening panel motor. | | | -
Install the overhead console trim panel. | | |