| Removal and Installation WARNING:This procedure involves fuel additive handling. Be prepared for fuel additive spillage at all times and always observe fuel handling precautions. Failure to follow these instructions may result in personal injury. WARNING:Eye, hand, ear protection and protective clothing are required to be worn during any general service or removal and installation procedure of fuel additive system components. Failure to follow this instruction may result in personal injury. WARNING:In case of fuel additive fluid contact with the skin or the eyes, flush immediately with water for a minimum of 15 minutes and seek prompt medical attention. Failure to follow these instructions may result in personal injury. WARNING:If fuel additive fluid is swallowed, call a physician immediately. rinse mouth immediately with water, do not induce vomiting. Failure to follow these instructions may result in personal injury. WARNING:Always provide adequate ventilation when working on the fuel additive fluid system or related components. Failure to follow these instructions may result in personal injury. WARNING:Do not smoke or carry lighted tobacco or open flame of any type when working on or near any fuel related components. Highly flammable vapors are always present and may ignite. Failure to follow these instructions may result in personal injury. CAUTION:Make sure the workshop area in which the vehicle is being worked on is as clean and as dust free as possible. Foreign matter from work on clutches, brakes or from machining or welding operations can contaminate the fuel system and may result in later malfunction. NOTE:After the fuel additive tank to fuel tank line has been connected it must be bled. For additional information on fuel additive tank to fuel tank line bleeding, Refer to WDS. | | -
Drain the fuel tank.
For additional information, refer to: Fuel Tank Draining (310-00 Fuel System - General Information, General Procedures).
| | | -
Remove the rear wheels and tires.
For additional information, refer to: Wheel and Tire (204-04 Wheels and Tires, Removal and Installation).
| | | -
Remove the right-hand rear splash shield. | | | -
Detach and disconnect the rear end wiring harness electrical connector. - Release the locking tang.
| | | -
Detach the rear end wiring harness from the chassis and fuel tank filler pipe clamp. | | | -
Disconnect the fuel additive tank to fuel tank line from the fuel additive tank (if equipped). - Release the locking tangs.
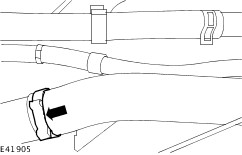
| 7. Remove the components in the order indicated in the following illustration(s) and table(s). 14 - Fuel tank filler pipe retaining bracket 8. To install, reverse the removal procedure. | | -
Initialize the door window motors.
For additional information, refer to: Door Window Motor Initialization (501-11 Glass, Frames and Mechanisms, General Procedures).
| | | -
NOTE:After the fuel additive tank to fuel tank line has been connected it must be bled. For additional information on fuel additive tank to fuel tank line bleeding, Refer to WDS. Carry out the fuel additive tank to fuel tank line bleed procedure. Refer to WDS and follow the on screen instructions. | Removal Details Item 1 : Rear springs | | -
WARNING:As the spring is under extreme tension care must be taken at all times. Failure to follow this instruction may result in personal injury. NOTE:After the spring has been compressed mark the location of tool and spring to aid installation. Using the special tools, compress the rear springs. | Item 2 : Rear damper lower retaining bolt | | -
Place a suitable transmission jack under the rear suspension and remove the rear damper lower retaining bolts. | Item 3 : Rear lower arm | | -
Lower the transmission jack and with the aid of another technician, pull the rear lower arm downwards to remove the rear spring. | Item 5 : Electronic parking brake cable | | -
Detach the electronic parking brake cable from the retaining clips. | Item 6 : Exhaust | | -
Detach the exhaust system from the middle hanger insulator. | Item 7 : Rear crossmember | | -
NOTE:The rear axle crossmember must be supported. Remove the rear axle crossmember retaining bolts. | Item 8 : Fuel tank filler pipe cover | | -
Open the fuel tank filler pipe cover. | Item 9 : Fuel tank filler pipe cap | | -
Detach the fuel tank filler pipe cap from the fuel filler pipe. | Item 10 : Fuel tank filler hose to fuel tank filler pipe hose retaining clamp | | -
NOTE:Make a note of the position of the fuel tank filler hose to fuel tank filler pipe hose retaining clamp. Make sure that the new replacement screw type clamp is positioned so that the screw head is in the same position as as the original filler hose retaining clamp. Remove and discard the fuel tank filler hose to fuel tank filler pipe hose retaining clamp. | Item 11 : Fuel tank filler hose to fuel tank filler pipe | | -
CAUTION:When removing the fuel tank filler hose to fuel tank filler pipe, do not use any sharp edge tools to lever off the pipes. Failure to follow this instruction may result in damage to the filler hose. Disconnect the fuel tank filler hose from the fuel tank filler pipe. | Item 12 : Fuel tank vent hose to fuel tank filler pipe retaining clamp | | -
NOTE:Make a note of the position of the fuel tank vent hose to fuel tank filler pipe retaining clamp. Make sure that the new replacement screw type clamp is positioned so that the screw head is in the same position as as the original vent hose retaining clamp. Remove and discard the fuel tank vent hose to fuel tank filler pipe retaining clamp. | Item 13 : Fuel tank vent hose to fuel tank filler pipe | | -
CAUTION:When removing the fuel tank vent hose to fuel tank filler pipe, do not use any sharp edge tools to lever off the pipes. Failure to follow this instruction may result in damage to the vent hose. Disconnect the fuel tank vent hose from the fuel tank filler pipe. | Installation Details Item 12 : Fuel tank vent hose to fuel tank filler pipe retaining clamp | | -
Install a new fuel tank filler hose to fuel tank filler pipe hose retaining clamp in the position shown. | Item 10 : Fuel tank filler hose to fuel tank filler pipe hose retaining clamp | | -
Install a new fuel tank filler hose to fuel tank filler pipe hose retaining clamp in the position shown. | Item 3 : Rear lower arm CAUTION:Make sure the top seat mounting is installed, and the spring ends butt correctly against the upper and lower spring seats. | | -
With the aid of another technician, pull the rear lower arm downwards to install the rear spring and special tools. | Item 2 : Rear damper lower retaining bolt | | -
Place a suitable transmission jack under the rear suspension and install the rear damper lower retaining bolts. | Item 1 : Rear springs | | -
WARNING:As the spring is under extreme tension care must be taken at all times. Failure to follow this instruction may result in personal injury. CAUTION:Make sure the top seat mounting is installed, and the spring ends butt correctly against the upper and lower spring seats. Using the special tools, release the compression on the rear spring the rear springs. | |