| Removal and Installation Special Tool(s) | | Support Bar, Engine 303-290A (21-140A) | | | Adapter for 303-290A 303-290-02 (21-140-02) | | | Adapter for 303-290A 303-290-04A (21-140-04A) | | | Adapter for 303-290A 303-290-07 (21-140-07) | | | Disconnect tool, spring-lock coupling 3/8" (red) 310-026 (23-023 A) | | | Disconnect tool, spring-lock coupling 3/4" (white) 412-069 (34-002) | Removal All vehicles | | -
Evacuate the air conditioning (A/C) system.
For additional information, refer to: Klimaanlage entleeren, evakuieren und befüllen (412-00, General Procedures).
| | | -
Remove the right- and left-hand front headlamps.
For additional information, refer to: Scheinwerfer (417-01, Removal and Installation).
| | | -
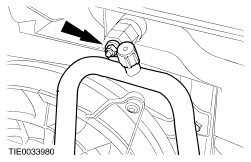
Remove the rear cover of the right-hand headlamp. | | | -
Remove the cover of the front bumper.
For additional information, refer to: Abdeckung - vorderer Stoßfänger (501-19, Removal and Installation).
| | | -
Remove the front bumper (right-hand side shown). | | | -
Detach the windshield washer reservoir from the front panel. | | | -
Disconnect the hood latch release cable from the hood latch. | | | -
Detach the battery distribution box from the front panel. | | | -
Detach the front battery cover from the battery carrier and front panel. | | | -
Detach the refrigerant line from the front panel. | | | -
Remove the air filter housing. For additional information, refer to: (303-12 ) Luftfilter - 1.9L Diesel (Removal and Installation), Luftfilter - 2.0L/2.3L (Removal and Installation), Luftfilter - 2.8L (Removal and Installation). | Vehicles with 2.0L, 2.3L or diesel engine | | -
Remove the air filter outlet hose (2.3L engine shown). | All vehicles | | -
Raise and support the vehicle.
For additional information, refer to: Anheben mit Hebebühne (100-02, Description and Operation).
| | | -
Remove the engine undershield (if equipped). | | | -
CAUTION:Close off the refrigerant line and the condenser to prevent contamination. Disconnect the condenser to evaporator line from the A/C condenser. | | | -
Detach the power steering hydraulic line from the front panel and lower it. | | | -
CAUTION:Secure the radiator at the left-hand and right-hand sides before removing the bolts. Detach the radiator from the front panel (right-hand side shown). - Remove the bolts.
- Pull the radiator rubber mountings from the front panel.
| | | -
CAUTION:Close off the refrigerant lines to prevent entry of contamination. Detach the rear evaporator refrigerant lines from the front evaporator refrigerant lines (if equipped). | | | -
Remove the front panel assembly (right-hand side shown). - Pull the air filter intake pipe from the front panel.
| | | -
Detach the evaporator refrigerant outlet line rear bracket from the right-hand side member. | | | -
CAUTION:Close off the refrigerant lines and the expansion valve to prevent contamination. Detach the evaporator refrigerant inlet line and the evaporator refrigerant outlet line from the expansion valve. | | | -
CAUTION:Close off the refrigerant lines to prevent entry of contamination. Detach the evaporator refrigerant inlet line from the condenser to evaporator line using the special tool. | | | -
CAUTION:Close off the refrigerant lines to prevent entry of contamination. Detach the evaporator refrigerant outlet line from the A/C compressor refrigerant inlet line using the special tool. | | | -
Detach the evaporator refrigerant inlet line and the evaporator refrigerant outlet line from the right-hand side member. | | | -
Remove the hood.
For additional information, refer to: Motorhaube (501-02, Removal and Installation).
| | | -
Install the special tools and secure the engine. | | | -
NOTE:Mark the installed position of the front engine mounting bracket to the engine mounting and to the engine mounting retaining plate. Remove the front engine mounting bracket. - Detach the ground cable from the bolt of the front engine mounting bracket.
- Remove the front engine mounting bracket nuts.
- Remove front engine mounting bracket bolts.
- Slightly lower the engine.
| | | -
Raise and support the vehicle.
For additional information, refer to: Anheben mit Hebebühne (100-02, Description and Operation).
| | | -
Pull the evaporator refrigerant outlet line downwards out of the engine compartment. | Installation | | -
CAUTION:Ensure that the front engine mounting bracket is in the original installation position. CAUTION:Only tighten to torque the nuts and bolts of the front engine mounting bracket once the engine has been aligned in its final position. NOTE:Install new refrigerant line O-rings. NOTE:Coat the refrigerant line O-rings with clean refrigerant oil before installation. Install the components in reverse order. | |