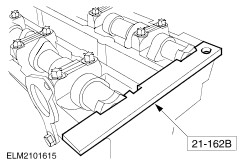
| In-vehicle Repair Special Tool(s) | | Universal flange holding wrench 15-030A | | | Installer, oil seal 21009B | | | Timing tool, camshaft alignment 21-162B | General Equipment Transmission jack Trolley jack Materials Name Specification Never Seeze ESE-M1244-A Bolt M10x70 Sealer ESK-M4G269-A Cable ties Engine Oil WSS-M2C912-A1 Removal | | -
General notes. - The positions of the engine mountings and engine roll restrictors are described looking from the transmission towards the engine.
- Owing to special model variants, some job steps do not apply to all vehicles. These are clearly marked in the text.
| | | -
Standard preparatory measures - Make a note of the radio keycode.
- Open up the coolant expansion tank.
- Make a note of the preset radio stations.
- Undo the right-hand front wheel nuts.
| | | -
Remove the intake pipe. - Pull out the plug of the mass air flow sensor (MAF sensor).
- Disconnect the plug of the intake air temperature sensor (IAT sensor) from the intake pipe.
- Remove the bolt and the two nuts.
- Release the retaining clips.
| | | -
Detach the accelerator cable. - Pull off the plastic clip and lay the accelerator cable to one side.
| | | -
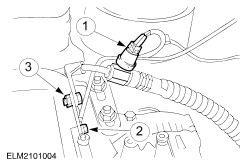
Disconnect the plug, the ground lead and the high-pressure pipe. - Pull out the plug of the power steering pressure switch (PSP switch).
- Detach the ground lead from the engine lifting eye.
- Disconnect the power steering high-pressure pipe.
| | | -
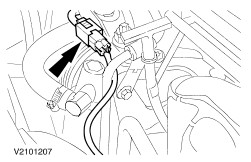
Detach the plug of the heated oxygen sensor (HO2S) from the engine mounting. | | | -
Remove the timing belt. For additional information, refer to Timing belt in this section. | | | -
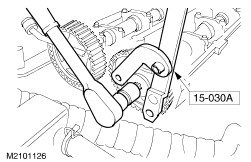
Remove the camshaft timing pulleys. - Detach the crankshaft timing belts, using the special tool to prevent movement.
| | | -
Remove the camshafts. - Slacken the bearing cap bolts in pairs in the indicated sequence half a turn at a time.
- Repeat this until the bearing caps are completely loose.
- Remove the bearing caps, camshafts and oil seals.
| Installation | | -
NOTE:The camshafts are marked. The inlet camshaft has an additional cam for the CMP sensor at the end of the shaft. Fit the camshafts. - Apply sealer to the bearing cap / cylinder head mating face at the timing belt end.
| | | -
NOTE:The numbering starts at '0' on the exhaust side and faces outwards. Install the camshaft bearing cap. | | | -
Install the camshaft bearing caps. - Screw in the bolts in pairs in the indicated sequence half a turn at a time.
- Repeat this until the bearing caps are in contact with the cylinder head.
- Tighten the bolts in pairs in the indicated sequence.
| | | -
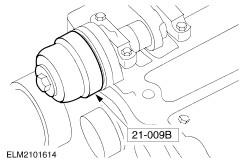
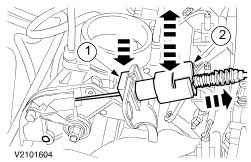
Fit the camshaft oil seals. - Lubricate the camshaft and the sealing lip of the oil seal with engine oil .
- Draw in the new oil seals using the special tool, a washer and an M10x70 bolt .
| | | -
Install the timing belt. For additional information, refer to Timing belt in this section. | | | -
Fit the HO2S plug to the engine mounting. | | | -
Connect the plug, the ground lead and the high-pressure pipe. - Connect the plug to the PSP switch.
- Attach the ground lead to the engine lifting eye.
- Fit the power steering high-pressure pipe.
| | | -
Attach the accelerator cable and adjust it. - Fit the cable in the bracket and slide on the plastic clip.
- Pull the clip off the accelerator cable.
- Pull the inner cable a few clicks out from the outer cable.
- Fully depress the accelerator pedal once and slide the clip back on.
- Check that the throttle plate opens fully when the accelerator pedal is depressed. If not, repeat the adjustment procedure.
| | | -
Fit the intake pipe. - Fit the retaining clips.
- Fit the bolt and the two nuts.
- Connect the plug of the IAT sensor at the intake pipe.
- Connect the MAF sensor plug.
| | | -
Standard finishing operations. - Connect the negative lead to the battery.
- Check the fluid levels and correct as necessary.
- Pressure-test the cooling system for leaks.
- Check the routing of the vacuum hoses and wiring and secure them with cable ties.
- Reprogram the preset radio stations.
- Carry out a road test to enable the powertrain control module (PCM) to collect data.
- Check the fluid levels again and correct as necessary.
| | |