Ford Workshop Service and Repair Manuals
HOME
FEATURES
MENU
INDEX
ABOUT US
Front Halfshaft RH >
< Front Drive Halfshafts
Puma 1998 (06.1997-12.2001)
Mechanical Repairs
2 Chassis
205 Driveline / 205-04 Front Drive Halfshafts
Description and Operation
Diagnosis and Testing
Removal and Installation
Front Halfshaft LH
Front Drive Halfshafts - Front Halfshaft LH
Puma 1998 (06/1997-12/2001)
Removal and Installation
Special Tool(s)
Driveshaft installer
14-041
Remover, front axle driveshaft
16-089
General Equipment
Puller
32 mm socket wrench
Plugs
Materials
Name
Specification
Transmission fluid
WSD-M2C200-C
Removal
NOTE:
Use an Allen key to stop the piston rod from turning.
Slacken the left-hand suspension strut nut by five turns (right-hand side shown).
Undo the left-hand halfshaft stub nut and the wheel nuts.
Wheel nuts
Destake the axle driveshaft stub nut and remove it with a
32 mm socket wrench
.
Raise the vehicle. For additional information, refer to Section
100-02 Jacking and Lifting
.
Detach the suspension arm and tie-rod.
Remove the wheel.
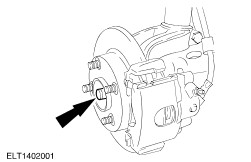
Press the front axle driveshaft from the wheel hub using a commercially available
puller
and detach it from the wheel hub (right-hand side shown).
Unscrew and remove the halfshaft stub nuts.
CAUTION:
The inner joint must not be bent at more than 18° and the outer joint must not be bent at more than 45°.
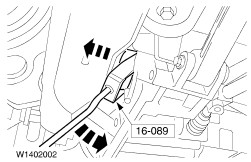
NOTE:
Escaping oil.
Press out the left-hand driveshaft and remove from the transmission.
Seal the transmission opening with
plugs
.
Installation
General note.
Renew all self-locking nuts and snap-rings.
CAUTION:
The inner joint must not be bent at more than 18° and the outer joint must not be bent at more than 45°.
CAUTION:
When installing the driveshaft, use the installation sleeve (supplied with every new oil seal) to protect the oil seal.
NOTE:
Ensure that the snap-ring engages securely.
Install the left-hand driveshaft with a new snap-ring.
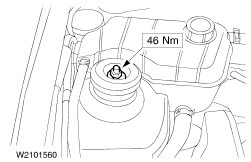
Fill up with transmission fluid to 5-10 mm below the lower edge of the level check bore.
Draw the driveshaft stub into the wheel hub.
Put the washer in place and fit the driveshaft stub nut (right-hand side shown).
Fit the suspension arm and tie-rod.
Fit the wheel and pre-tighten the nuts.
Lower the vehicle.
NOTE:
Use a 32 mm socket wrench.
Tighten the driveshaft stub nut and the wheel nuts.
Secure the halfshaft stub nut by staking.
Wheel nuts
NOTE:
Use an Allen key to stop the piston rod from turning.
Tighten the left-hand suspension strut nut (right-hand side shown).
Standard finishing operations.
Check the fluid levels and correct as necessary.
Road test the vehicle.
Check the fluid levels again and correct as necessary.
Mechanical Repairs
2 Chassis
205 Driveline / 205-04 Front Drive Halfshafts
Description and Operation
Diagnosis and Testing
Removal and Installation
Front Halfshaft LH
Front Halfshaft RH >
< Front Drive Halfshafts