| Removal and Installation Special Tool(s) | | Remover, refrigerant line 5/8" (black) 34-003 | | | Remover and installer, radiator hose clip 24-003 | Materials Name Specification O-rings (green) Removal | | -
Standard preparatory measures. - Lay protective covers over the fenders.
| | | -
NOTE:Do not drain the coolant expansion tank. Detach the coolant expansion tank and lay it to one side. | | | -
Detach the air cowl grille. - Disconnect the hose from the windscreen washer jet.
| | | -
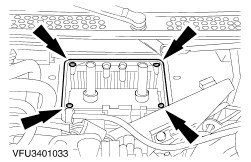
Undo the bulkhead extension. - Pull the bulkhead extension forwards.
| | | -
NOTE:Plug the heater radiator and the coolant pipes. NOTE:Do not mix up the hoses when fitting them (mark them if necessary). Detach the heater coolant hoses using Special Tool 24-003. | | | -
NOTE:Close off the refrigerant lines and evaporator with plugs. Detach the refrigerant lines at the evaporator. | | | -
Remove the evaporator (push-fit). | Installation | | -
NOTE:Renew the O-rings and coat with refrigerant oil. Refit the components in the reverse order. - Check the coolant level and correct if necessary.
- Remove the protective covers.
| | | -
Standard finishing operations. | | | -
Check the operation of the air conditioning system. | | | -
Check the operation of the heater. | | |