| Removal and Installation Brake hose clamp Transmission jack Removal | | -
Remove the wheel spindles.
For additional information, refer to: Wheel Spindle (204-02 Rear Suspension, Removal and Installation).
| | | -
Remove the stabilizer bar (if equipped).
For additional information, refer to: Rear Stabilizer Bar (204-02 Rear Suspension, Removal and Installation).
| | | -
Detach the brake tube from the axle housing. | | | -
Detach the wheel speed sensor wiring harness and brake tube from the axle housing. | | | -
Remove the brake fluid reservoir cap. | | | -
Drain the brake system. - Connect one end of a suitable piece of clear plastic pipe to the brake caliper bleed nipple and place the other end into a suitable container.
- Loosen the brake caliper bleed nipple.
- Depress the brake pedal until all the brake fluid is drained from the brake fluid reservoir.
- Tighten the brake caliper bleed nipple.
- Repeat the draining procedure on the opposite side brake caliper.
| | | -
Install the brake fluid reservoir cap. | | | -
Detach the brake hose union from the axle housing. | | | -
Detach the shock absorbers from the axle housing. | | | -
Detach the brake load sensor proportioning valve from the axle housing (if equipped). | | | -
Remove the spring U-bolts. | | | -
Remove the axle assembly. | Installation NOTE:Final tightening of the rear suspension components should be carried out when the vehicle weight is on the road wheels. | | -
NOTE:Do not fully tighten the spring U-bolt nuts at this stage. Install the axle assembly. - Locate the axle to the springs.
- Install the guide plate and U-bolts.
- Install the nuts.
| | | -
Attach the brake load sensor proportioning valve to the axle housing. | | | -
Attach the brake tube to the axle housing. | | | -
NOTE:Do not fully tighten the shock absorber nuts at this stage. Attach the shock absorbers to the axle housing. | | | -
Install the stabilizer bar (if equipped).
For additional information, refer to: Rear Stabilizer Bar (204-02 Rear Suspension, Removal and Installation).
| | | -
Install the wheel spindles.
For additional information, refer to: Wheel Spindle (204-02 Rear Suspension, Removal and Installation).
| | | -
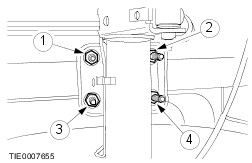
Tighten the nuts in the sequence shown in seven stages. - Stage 1: Tighten nuts 1 through 4 to 25 Nm.
- Stage 2: Tighten nuts 1 through 4 to 50 Nm.
- Stage 3: Tighten nuts 1 through 4 to 75 Nm.
- Stage 4: Tighten nuts 1 through 4 to 100 Nm.
- Stage 5: Tighten nuts 1 through 4 to 125 Nm.
- Stage 6: Tighten nuts 1 through 4 to 150 Nm.
- Stage 7: Tighten nuts 1 through 4 to 175 Nm.
| | | -
Tighten the shock absorber nuts. | | | -
Adjust the brake load sensor proportioning valve.
For additional information, refer to: Brake Load Sensor Proportioning Valve Adjustment (206-00 Brake System - General Information, General Procedures).
| | | -
Bleed the brake system. For additional information, refer to: (206-00 Brake System - General Information) Brake System Bleeding (General Procedures), Brake System Pressure Bleeding (General Procedures). | | |