| Removal and Installation Removal | | -
Raise and support the vehicle.
For additional information, refer to: Jacking (100-02 Jacking and Lifting, Description and Operation) /
Lifting (100-02 Jacking and Lifting, Description and Operation).
| | | -
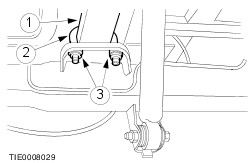
Remove the spring U-bolts. | | | -
Remove the spring rear nut and bolt. | | | -
Remove the spring front nut and bolt. | Installation NOTE:Final tightening of the rear suspension components should be carried out when the vehicle weight is on the road wheels. | | -
CAUTION:Install a new locknut. NOTE:Do not fully tighten the spring rear nut at this stage. Install the spring front nut and bolt. | | | -
CAUTION:Install a new locknut. NOTE:Do not fully tighten the spring rear nut at this stage. Install the spring rear nut and bolt. | | | -
NOTE:Install new spring U-bolt nuts. NOTE:Do nut fully tighten the spring U-bolt nuts at this stage. Install the spring U-bolts. - Locate the spring to the rear axle assembly.
- Install the guide plate and U-bolts.
- Install the nuts.
| | | -
Tighten the spring front nut. | | | -
Tighten the spring rear nut. | | | -
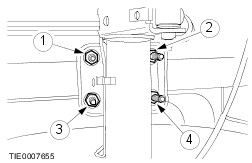
NOTE:Some variants only allow limited access to the U-bolts and may require a special sort of torque wrench. Tighten the spring U-bolt nuts in the sequence shown in seven stages. - Stage 1: Tighten nuts 1 through 4 to 25 Nm.
- Stage 2: Tighten nuts 1 through 4 to 50 Nm.
- Stage 3: Tighten nuts 1 through 4 to 75 Nm.
- Stage 4: Tighten nuts 1 through 4 to 100 Nm.
- Stage 5: Tighten nuts 1 through 4 to 125 Nm.
- Stage 6: Tighten nuts 1 through 4 to 150 Nm.
- Stage 7: Tighten nuts 1 through 4 to 175 Nm.
| | |