
H1 V8-6.5L DSL Turbo (1999)
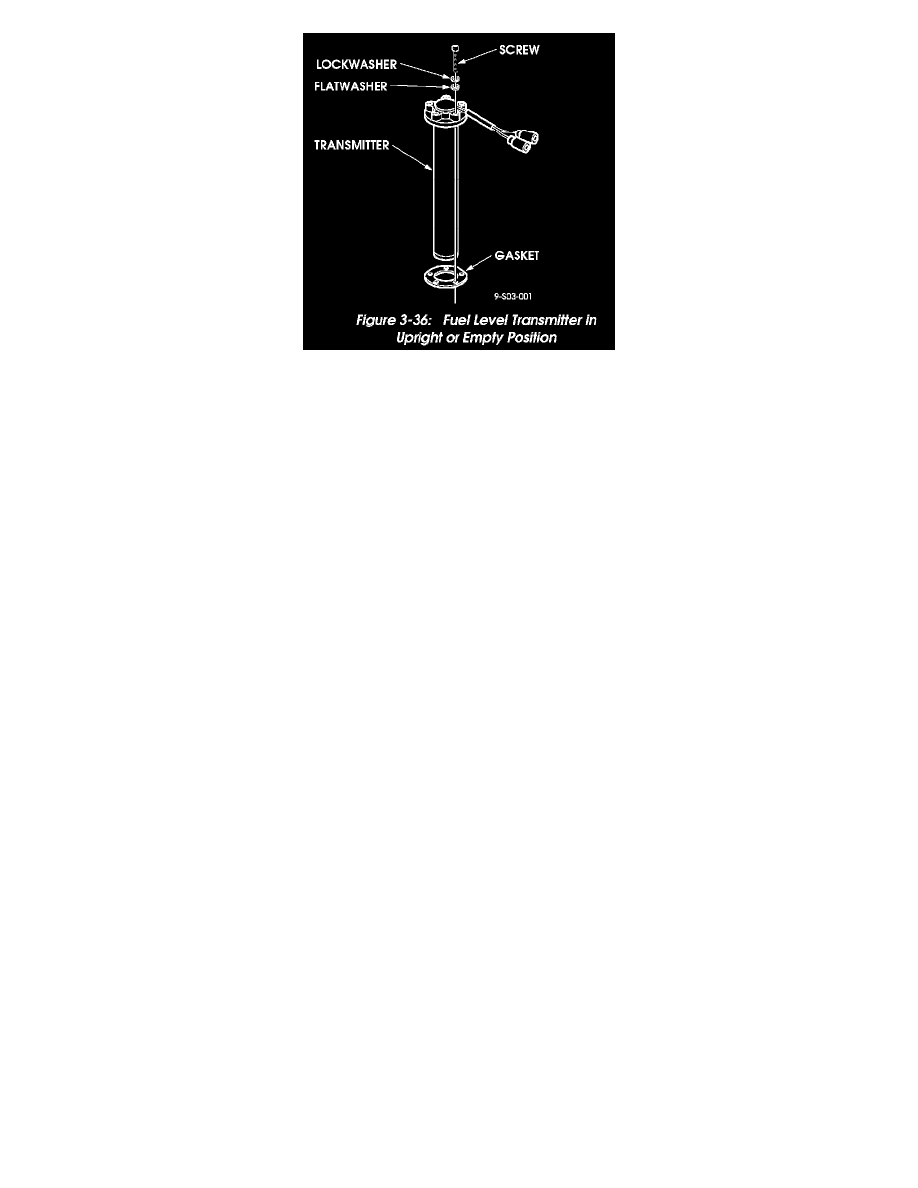
Figure 3-36: Fuel Level Transmitter in Upright or Empty Position
Check fuel level transmitter operation as follows:
1. Hold transmitter in the upright or empty position (Figure 3-36).
2. Using an ohmmeter, check resistance value at terminals. Resistance should be 268 ± 20 Ohms.
3. Hold transmitter in the inverted position simulating a full tank. Resistance should fall to 19.3 ± 8 Ohms.
Installation
CAUTION: Do not overtighten access plate or transmitter fasteners. Gasket damage and improper sealing could result.
1. Thoroughly clean all gasket surfaces.
2. Place new O-rings on access plate retainer studs and position access plate retainer in tank (Figures 3-34 and 3-35).
3. Set gasket and access plate over studs and onto tank.
4. Apply liquid teflon thread sealant to studs and loosely install washers and locknuts until no clearance exists between access plate, gasket and tank.
5. Snug access plate locknuts in small increments and in a systematic circular pattern. Tighten locknuts until gasket bulges or until maximum torque
of 72 lb-in. is obtained.
6. Apply liquid teflon thread sealant to transmitter mounting screws.
7. Secure gasket and transmitter to access plate using same method as indicated for access plate above.
8. Cap all tank fittings and perform leak check. Apply leak check solution or soapy water around access plate and transmitter gaskets and fasteners.
Pump 3 p.s.i. of compressed air into tank and verify absence of leaks.
Quick Connect Fittings
Quick connect fittings are used at the main tank fuel tubes, auxiliary tank fuel tubes, and at the fuel tank selector valve.
Two types of fittings are used. One type is an all plastic push on style with removable retainer. The second style is a metal, one-piece fitting with an
internal tension clip to retain it. The plastic fitting retainer only requires a screwdriver and needle-nose pliers to remove. The metal fitting requires a
release tool, such as J 37088-A, in order to disconnect it.
The metal fittings are used at the main tank. The plastic, two-piece fittings are used at the auxiliary tank and fuel selector valve.
Metal Fittings
1. To disconnect, slide the release tool onto the line and into the fitting.
2. Press the tool inward to unseat the internal clip and pull the line off the fuel tube.
3. To reconnect, just push the fitting onto the line until it snaps or clicks into place.
4. Pull on the fitting afterward to verify proper seating.
Plastic Fittings
1. To disconnect, raise the retainer tab with a small flat blade screwdriver and remove the retainer with needle-nose pliers.
2. To reconnect, push the fitting onto the tube, insert the retainer through the fitting sides, and seat it firmly.
3. Be sure the retainer seats behind the fuel tube flange.
4. Pull on the fitting afterward to verify proper seating.