
Exterior lights control
- Make
- Lancia
- Model
- Thesis Factory Service Manual
- Year
- 2002–2009
- Section
- Exterior lighting › Exterior lights control
EXTERIOR LIGHTS CONTROL
COMPOSITION
The control panel for the exterior lights is located on the left side of the dashboard.
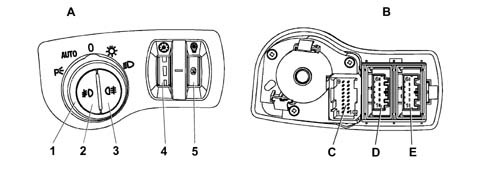
- A - FRONT VIEW
- B - REAR VIEW
- C - Exterior lights control connector
- D - Interior lights dimmer connector
- E - Exterior lights dimmer connector
- 1 Light control knob
- 2 Front fog light control button
- 3 Rear fog lamp control button
- 4 Interior lights dimmer
- 5 Exterior lights dimmer
The CLE (exterior lights control) is connected to the dashboard wiring.
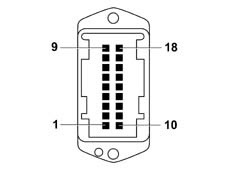
| PIN | FUNCTION |
|---|---|
| 1 | Earth |
| 2 | Not connected |
| 3 | Not connected |
| 4 | Side lights control negative signal |
| 5 | Dipped headlamps control negative signal |
| 6 | Not connected |
| 7 | Negative signal from rear fog lamp control button |
| 8 | Negative signal from fog lights control button |
| 9 | Main beam headlamp enablement negative signal for steering column switch unit (connection with PA5) |
| 10 | Ideogram control dimmed supply |
| 11 | Parking lights control negative signal |
| 12 | Not connected |
| 13 | Not connected |
| 14 | Not connected |
| 15 | Not connected |
| 16 | Not connected |
| 17 | Not connected |
| 18 | Not connected |
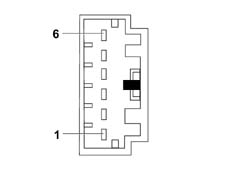
| PIN | FUNCTION |
|---|---|
| 1 | INT from fuse 49 |
| 2 | Ideogram light dimmed supply |
| 3 | Lighting adjustment analogue signal to NQS |
| 4 | Earth |
| 5 | Not connected |
| 6 | Not connected |
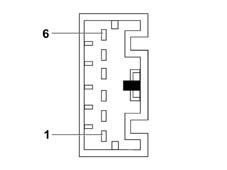
| PIN | FUNCTION |
|---|---|
| 1 | +dipped headlamps from fuse 13 |
| 2 | Ideogram light dimmed supply |
| 3 | Dusk sensor setting adjustment analogue signal to NIT (Connect) |
| 4 | Earth |
| 5 | Not connected |
| 6 | Not connected |
SPECIFICATIONS
In addition to the control for the exterior lights, the panel also houses two dimmers. One for adjusting the intensity of the instrument panel light, the other for adjusting the setting of the dusk sensor.
OPERATION
Exterior lights control
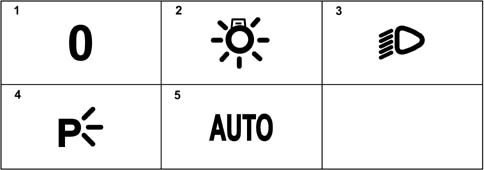
| PIN | FUNCTION |
|---|---|
| 1 | All the lights are off |
| 2 | Side lights and no. plate lights on |
| 3 | Dipped headlamps on |
| 4 | Parking lights on |
| 5 | If this position is selected, the lights come on or go off according to the strategies adopted by the dusk sensor |
DUSK SENSOR
Depending on the setting selected by the user (if there is an AUTO control for the lights control knob) the dusk sensor adjusts the automatic switching on of the dipped headlamps and side lights.
The sensor setting can be adjusted using the dimmer 5.
Control and operation
To be carried out on the vehicle, complete with battery.
Position the vehicle in a brightly lit area (for example with a halogen lamp directed on the windscreen in the area of the sensor).
Place the selector in the "automatic" position and check that the lights remain off.
Obscure the sensor with a black screen and check that the lights come on without a noticeable delay.
Remove the black screen from the sensor and check that the lights go out with a delay of a few seconds.
RAIN SENSOR
If the rain sensor (which is in one piece with the dusk sensor) controls the switching off of the side lights and the dipped headlamps (and obviously with the exterior lights knob in the AUTO position) the bulb switching off strategy is as follows:
- dipped headlamp switching off: when the command is received from the dusk sensor
- side lights switching off: 10 seconds after the switching off of the dipped headlamps.
Control and operation
To be carried out on the vehicle, complete with battery.
Place the steering column switch unit wiper lever from the off position to the "automatic" position (the sensor setting ring nut, corresponding to the selector for the intermittent speed on vehicles without an automatic sensor, can be in any position).
Check that the automatic operation of the wipers is activated by the rain sensor (when the glass is dry it carries out a reference wiping cycle).
Wet the windscreen slightly in the area of the sensor (with a spray/spone) and check that the wipers are activated and that when the glass in the area of the sensor is dry once again, the wipers are deactivated.
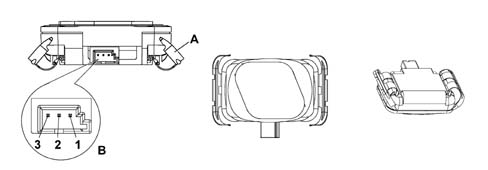
- A - Fastening tabs
- B - Connector
Connector B (3-way)
| PIN | FUNCTION |
|---|---|
| 1 | battery + |
| 2 | earth |
| 3 | signal |
Parts & tools for this job For 2002 Lancia Thesis
- PARTReplacement bulbsSearch: Lancia Thesis 2002 bulbs
- TOOLDigital multimeterSearch: automotive digital multimeter
Links open Amazon search results in a new tab. As an Amazon Associate I earn from qualifying purchases.