
DASH PANEL ASSEMBLY
- Make
- Land Rover
- Model
- Range Rover Classic
- Section
- REPAIR › DASH PANEL ASSEMBLY
CHASSIS AND BODY
43
REPAIR
DASH PANEL ASSEMBLY
Service repair no - 76.46.23
Remove
1. Move front seats to rearmost position.
2. Disconnect battery negative lead.
3. Disconnect air bag multiplugs under dash panel.
CAUTION: When air bags are fitted,
reference must be made to the Airbag
Supplementary Restraint System section.
4. Remove passenger’s side glove box.
5. Remove driver’s side access panel.
6. Remove centre console assembly.
See Centre
Console
7. Remove airbag from steering wheel.
See
SUPPLEMENTARY RESTRAINT SYSTEM,
Repair, Driver’s Airbag Module
8. Remove airbag from panel panel.
See
SUPPLEMENTARY RESTRAINT SYSTEM,
Repair, Passenger’s Airbag Module
9. Release clamp and lower steering column.
10. Remove steering wheel.
See STEERING,
Repair, Steering Wheel
11. Remove column switch assembly.
See
SUPPLEMENTARY RESTRAINT SYSTEM,
Repair, Column Switch Assembly
12. Remove instrument housing.
See
ELECTRICAL, Repair, Instrument Binnacle
13. Remove radio.
See ELECTRICAL, Repair,
Radio
14. Remove exterior mirrors switch panel.
See
ELECTRICAL, Repair, Auxiliary Switches
and Bulbs
15. Remove air suspension switch panel.
See AIR
SUSPENSION, Repair, Operating Switches
and Bulbs
16. Remove switch panel.
See ELECTRICAL,
Repair, Switch Panel
17. Remove clock panel assembly.
See
ELECTRICAL, Repair, Clock
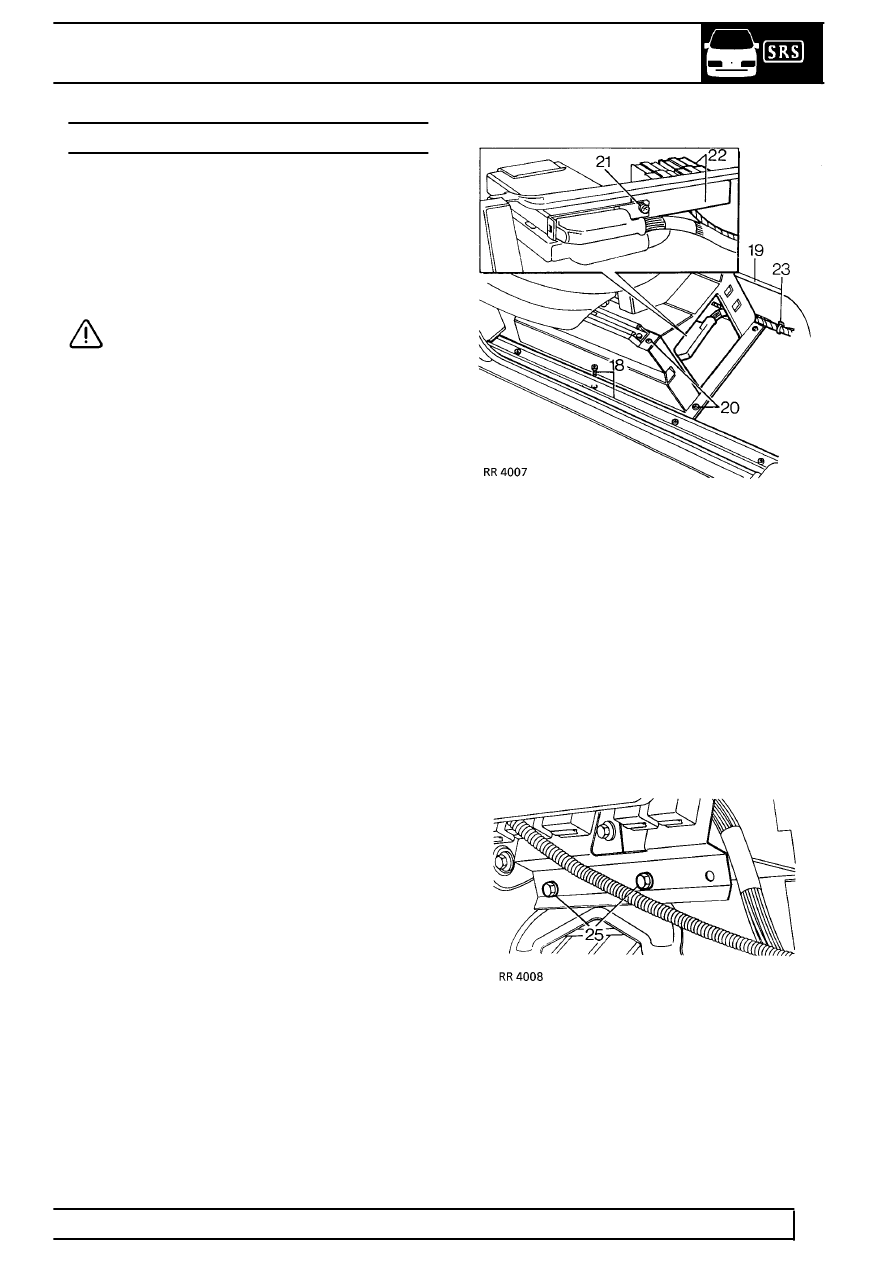
18. Undo 4 screws and remove RH front door tread
plate.
19. Position RH footwell carpet aside.
20. Undo 4 screws and remove front finisher from
RH seat.
21. Remove screw securing air suspension ECU
bracket.
22. Release multiplug from bracket and disconnect
multiplug.
23. Cut tie securing air suspension switch harness to
tunnel.
24. Position switch harness aside and lay carpet in
footwell.
25. Undo screw securing mounting bracket and
position passenger’s side relay assembly aside.
26. Set heater controls fully clockwise.
27. Note position of levers, disconnect heater control
cables from levers and outer cable from retaining
clips.
Parts & tools for this job For Land Rover Range Rover
- TOOLTrim removal tool kitSearch: trim removal tool kit
- PARTTouch-up paintSearch: Land Rover touch up paint
- PARTPanel clip assortmentSearch: Land Rover panel clips assortment
Links open Amazon search results in a new tab. As an Amazon Associate I earn from qualifying purchases.