
3 L4-2.5L (2010)
7. Connect the SST (Deployment tool) to the battery. Connect the power supply red clip to the positive battery terminal, and the black clip to the
negative battery terminal.
8. Verify that the red lamp on the SST (Deployment tool) is illuminated.
9. Verify that all persons are standing at least 6 m {20 ft} away from the vehicle.
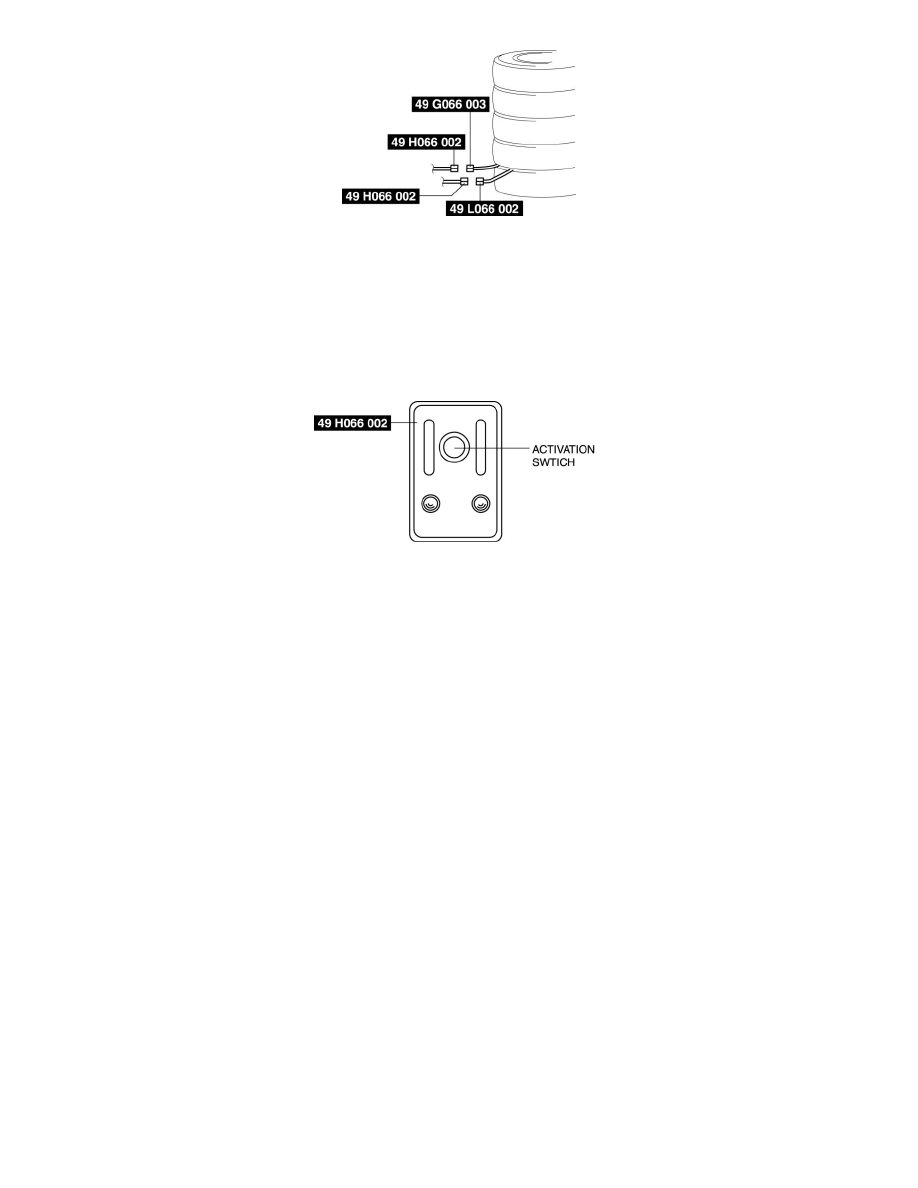
10. Press the activation switch on the SST (Deployment tool) connected with 49 L066 002 (a yellow connector) of the SST (Adapter harness), and
after 3 s, press the activation switch on the other SST (Deployment tool) to operate (deploy) the air bag module (both inflators).
WARNING:
-
Verify that air bag module operation (explosive) sound occurs twice. If no operation (explosive) sound was heard or a single operation
(explosive) sound was heard, both inflators would not have operated (deployed) properly. This may cause serious injury if the air bag module
operates (deploy) unexpectedly. If the two operation (explosive) sounds are not heard, perform Step 10 again. If a total of two operation
(explosive) sounds cannot be verified even though Step 10 is performed again, leave the air bag module alone for 30 min or more before
approaching it again.
-
The air bag module is very hot immediately after it is operated (deployed). You can be burned. Do not touch the air bag module for at least 15
min after deployment.
11. Disconnect the SST (Deployment tool) from the SST (Adapter harness).
Passenger-side Air Bag Module
WARNING:
-
The passenger-side air bag module is a dual inflator type. If one inflator is forced to operate (deploy), the other may operate (deploy) accidentally.
To prevent injury while disposing of the air bag module, make sure to operate (deploy) both passenger-side air bag module inflators
simultaneously, following the procedure below.
1. Remove the following parts:
a. Passenger-side front scuff plate See: Body and Frame/Interior Moulding / Trim/Scuff Plate/Service and Repair/Front Scuff Plate
Removal/Installation
b. Passenger-side front side trim See: Body and Frame/Interior Moulding / Trim/Trim Panel/Service and Repair/Front Side Trim
Removal/Installation
c. Dashboard under cover See: Body and Frame/Interior Moulding / Trim/Dashboard / Instrument Panel/Service and Repair/Removal and
Replacement/Dashboard Under Cover Removal/Installation
d. Glove compartment See: Body and Frame/Interior Moulding / Trim/Glove Compartment/Service and Repair
e. Passenger-side lower panel See: Body and Frame/Interior Moulding / Trim/Dashboard / Instrument Panel/Service and Repair/Removal and
Replacement/Lower Panel Removal/Installation
f.
SIRIUS satellite radio unit (with SIRIUS satellite radio system) See: Accessories and Optional Equipment/Radio, Stereo, and Compact