
Drive Belt: Diagrams
- Make
- Mercury
- Model
- Capri
- Engine
- V8-302 5.0L
- Year
- 1982
- Section
- Drive Belt › Diagrams
Drive Belt: Diagrams
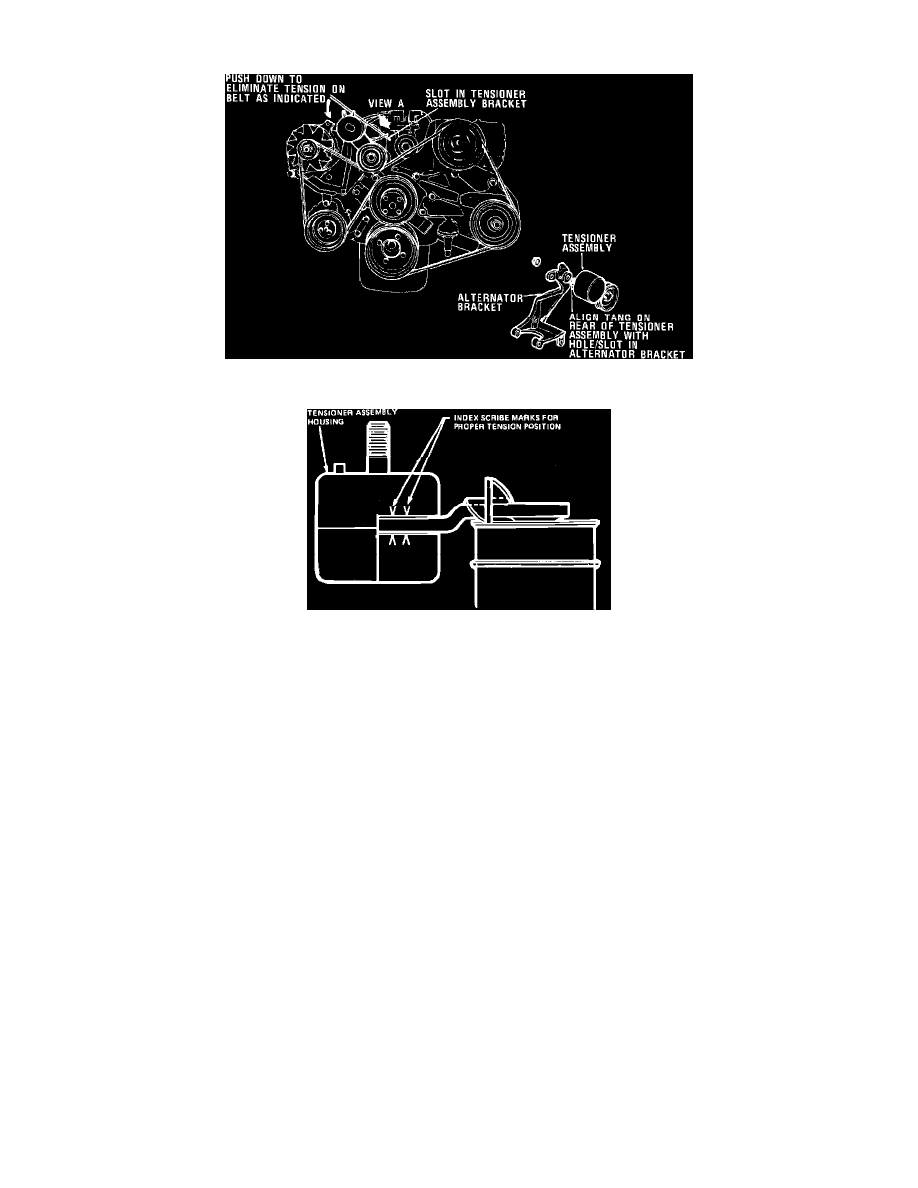
Fig. 2 Serpentine drive belt
Fig. 2 Serpentine Drive Belt
Some engines are equipped with a serpentine drive belt, Fig. 2, to drive the accessories in place of the usual arrangement. This ``V'' ribbed belt drives
the fan/water pump, alternator, secondary air pump, optional A/C compressor and optional power steering pump. The tensioner arm should be checked
to ensure that the top edge of the arm is located between the two index marks scribed on the circumference next to the slot of the tensioner housing, Fig.
3. If the tensioner arm is not properly aligned, the drive belt and pulleys should be inspected for wear and binding. If the drive belt and pulleys are
satisfactory, the tensioner must be replaced as outlined in the following procedure:
1.
Insert a 16 inch pry bar or equivalent in the slot of the tensioner bracket, and using the tensioner housing as a fulcrum, push the pry bar downward
to force the tensioner pulley upward, relieving tension on belt, Fig. 2.
2.
Remove drive belt.
3.
Remove bolt securing tensioner assembly to alternator bracket.
4.
Remove tensioner assembly.
5.
Position tensioner assembly so the tang, located on the rear of the assembly, is placed to fit in the hole or slot in alternator bracket.
6.
Install the tensioner assembly bolt through the hole in the alternator bracket and torque bolt to 55---80 ft. lbs.
7.
Install drive belt by inserting the pry bar as outlined in Step 1. Refer to decal located on top of the windshield washer/coolant expansion reservoir
for proper belt routing.
8.
Remove pry bar.
9.
The drive belt is automatically tensioned when the tensioner arm is located between the two index marks, Fig. 3.
Pinch or Ctrl + scroll to zoom. Double-tap to reset.
Parts & tools for this job For 1982 Mercury Capri 5.0L
- PARTOil filterSearch: Mercury Capri 1982 5.0L oil filter
- TOOLOil filter wrenchSearch: oil filter wrench
- FLUIDEngine oilSearch: Mercury Capri engine oil
Links open Amazon search results in a new tab. As an Amazon Associate I earn from qualifying purchases.