
Sable V6-183 3.0L DOHC VIN S MFI (1997)
Orifice Tube: Service and Repair
NOTE: The A/C evaporator core orifice should be replaced whenever an A/C compressor is replaced for lack of performance (internal damage).
The A/C evaporator core orifice is located in the discharge line.
The A/C evaporator core orifice is constructed with a plastic body. two screens and a small brass tube down the center of the A/C evaporator core orifice
body. Two O-ring seals are around the A/C evaporator core orifice body to seal against leakage around the body.
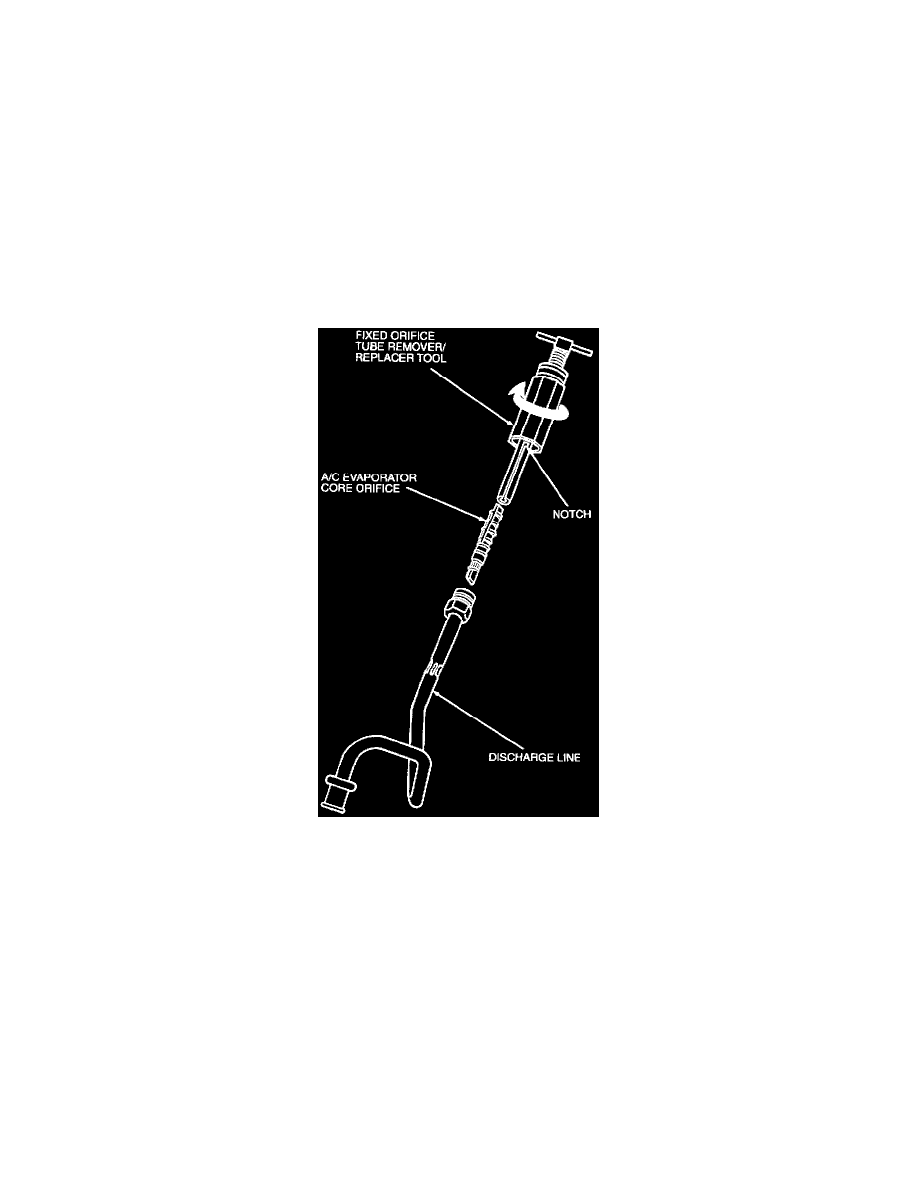
CAUTION: Do not attempt to remove the A/C evaporator core orifice with pliers or to twist or rotate the A/C evaporator core orifice in the discharge
tube. To do so will break the fixed orifice tube body in the discharge tube. Use only the recommended tool.
REMOVAL
1. Discharge A/C system. Refer to System Discharging and Recovery. See: Service and Repair/Discharging and Recovery
2. Remove condenser to evaporator tube.
3. Pour a small amount of clean Motorcraft YN-12b refrigerant oil or equivalent meeting Ford Specification WSH-M1C231-B into the outlet end of
the discharge line to lubricate the tube and O-ring seals during removal of the A/C evaporator core orifice.
4. Engage the Fixed Orifice Tube
Remover/Replacer T83L-19990-A with the two tangs on the A/C evaporator core orifice. Do not twist or rotate the A/C evaporator core orifice in
the discharge line as it may break off.
5. Hold the T-handle of the Fixed Orifice Tube Remover/Replacer T83L-19990-A to keep it from turning and run the nut on the tool down against
the discharge line until the A/C evaporator core orifice is pulled from the tube.
a. NOTE: If the A/C evaporator core orifice breaks in the discharge line, remove it from the tube with Broken Orifice Tube Extractor
T83L-19990-B as follows:
To remove a broken A/C evaporator core orifice, insert the screw end of the Broken Orifice Tube Extractor T83L-19990-B into the discharge
line and thread the screw end of the tool into the brass tube in the center of the A/C evaporator core orifice. Pull the A/C evaporator core
orifice from the discharge line.
If only the brass center tube is removed during Step a, insert the screw end of Broken Orifice Tube Extractor T83L-19990-B into the discharge
line and screw the end of the tool into the A/C evaporator core orifice body. Pull the A/C evaporator core orifice body from the discharge line.
INSTALLATION
1. Lubricate the O-ring seals on the A/C evaporator core orifice liberally with clean Motorcraft YN-12b refrigerant oil or equivalent meeting Ford
specification WSH-M1C231-B.
2. Place the A/C evaporator core orifice in the Fixed Orifice Tube Remover/Replacer T83L-19990-A and insert the A/C evaporator core orifice into
the discharge line until the A/C evaporator core orifice is seated at the stop.