
Diamante V6-2972cc 3.0L SOHC (1992)
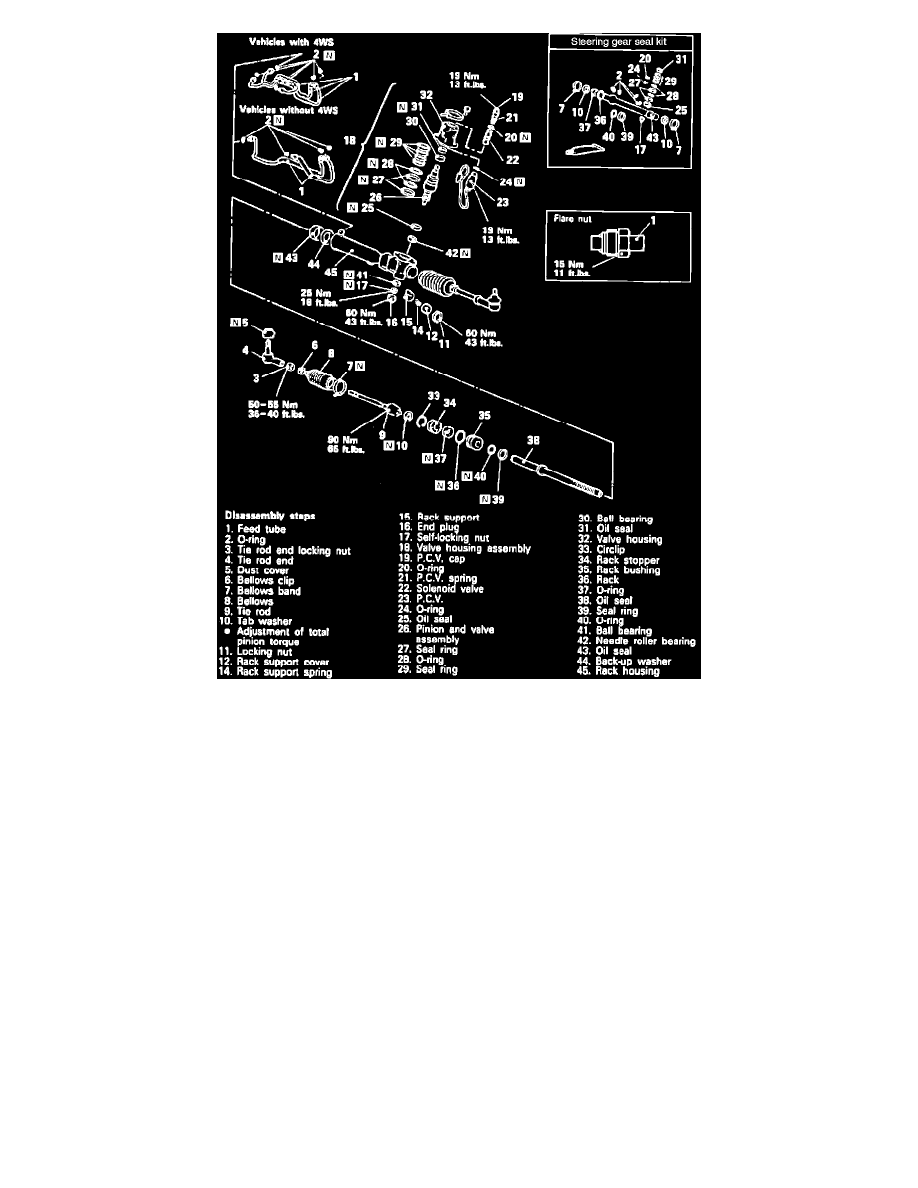
Fig. Power Steering Gear. Diamante W/Electronic Steering Gear
Disassemble power steering gear in numbered sequence shown in Figs. 17 through 22, noting the following:
1.
Using a screwdriver, remove the dust cover from the tie rod end. Loosen, then remove the boot retaining band.
2.
Unstake the tab washer which retains the tie rod and rack with a chisel.
3.
Disconnect end plug caulking and remove end plug.
4.
Using special tool No. MB991204 or equivalent, remove the rack support cover from the gearbox.
5.
Using a plastic hammer, gently tap the pinion to remove it.
6.
Using a socket, remove the oil seal and the ball bearing from the valve housing simultaneously.
7.
Turn the rack stopper clockwise until the end of the circlip comes out of the slot in the rack housing, then turn the stopper counterclockwise to
remove the circlip.
8.
Remove the rack, at this time also take out the rack stopper and the rack bushing.
9.
Partially bend oil seal and remove from rack bushing, do not damage oil seal press fitting surface.
10.
Using a brass bar, remove the ball bearing from the gear housing.
11.
Using special tool No. MB991120 or equivalent, remove the needle roller bearing from the rack housing.
12.
Remove the back-up washer and oil seal from the gear housing, do not damage the inner surface of the rack cylinder of the gear housing.
Inspection
1.
Inspect the rack tooth surfaces for damage or wear, then the oil seal contact surfaces for uneven wear.
2.
Inspect the rack for bends.
3.
Check the pinion gear tooth surfaces for damage or wear, then check for worn or defective seal.
4.
Check bearing for roughness or abnormal noise during operation, check the bearing for play.
5.
Check the needle roller for bearings for roller slip-off.
6.
Check the cylinder inner surface of the rack housing for damage.
7.
Check mounting rubber for cracks or damage. Replace as required.