Montero Sport XLS 4WD V6-3.0L SOHC (1999)

Battery: Testing and Inspection
Battery Testing Procedure
STEP 1. Check the battery cables.
1. Remove negative cable, then positive cable.
2. Check for dirty or corroded connections.
If the battery cables are dirty or corroded connections, clean the battery cables. Then go to Step 2.
If the battery cables are normal, go to Step 2.
STEP 2. Check the battery post.
Check for loose battery post.
If the battery post is faulty, replace the battery. Then go to Step 4.
If the battery post is normal, go to Step 3. STEP 3. Check the battery case and cover.
1. Remove hold-downs and shields.
2. Check for broken/cracked case or cover.
If the battery case or cover is faulty, replace the battery. Then go to Step 4.
If the battery case or cover is normal, go to Step 4.
STEP 4. Check the open circuit voltage.
1. Turn headlights on for 15 seconds.
2. Turn headlights off for 2 minutes to allow battery voltage to stabilize.
3. Disconnect cables.
4. Read open circuit voltage.
-
Open circuit voltage should be 12.4 volts or more.
If less than 12.4 volts, go to Step 5.
If 12.4 volts or more, go to Step 6.
STEP 5. Charge battery.
Charge battery at 5 amps for 10.4 hours. Then re-test, go to Step 4.
STEP 6. Check the load test.
1. Connect a load tester to the battery.
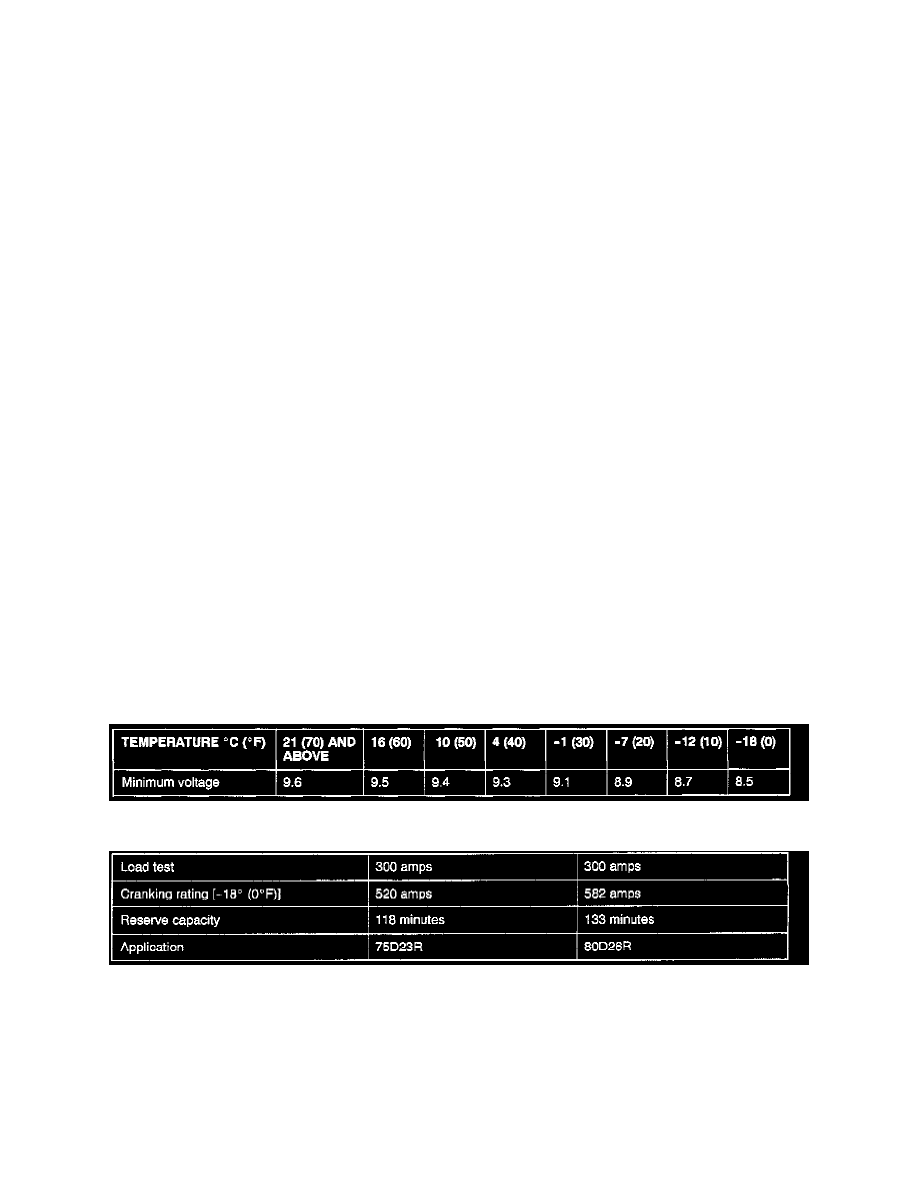
2. Load the battery at the recommended discharge rate (see LOAD TEST RATE CHART) for 15 seconds.
3. Read voltage after 15 seconds, then remove load.
4. Compare the measured value with the minimum voltage. (See LOAD TEST CHART.)
-
Voltage should be higher than minimum voltage.
If less than minimum voltage, replace the battery. Then go to Step 4.
If higher than minimum voltage, battery is normal.
LOAD TEST CHART
LOAD TEST RATE CHART
