
Crankshaft, main and big-end bearings - refit (page 3 of 5)
- Make
- Rover
- Model
- Engine & gearbox overhaul K Series Engine Overhaul Manual
- Section
- Overhaul
OverhaulCrankshaft, main and big-end bearings - refit · page 3 of 5
Pressed steel sump
- Clean inside and joint face of sump. Check condition of gasket, renew if damaged or showing signs of deterioration.
- Fit gasket to sump, ensure its 7 pegs are fully located.
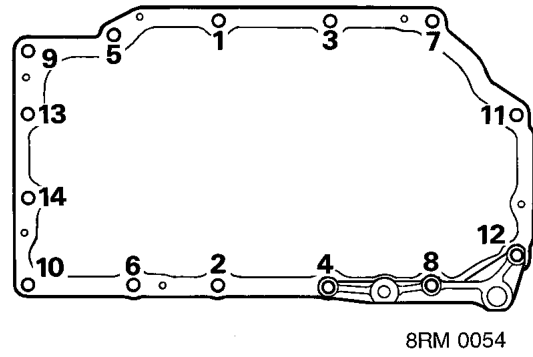
- Fit sump to bearing ladder, fit 11 new Patchlok bolts and using sequence shown, tighten to 5 Nm.
CAUTION: Early engines: M6 bolts Later engines: M8 bolts
- Fit anti-beaming bracket support, where fitted; fit and tighten 3 new M6 or M8 x 35 Patchlok bolts at positions 4, 8 and 12 to 5 Nm.
- Progressively tighten sump bolts in sequence shown to: M6/M8 bolts: 10 Nm
- Fit anti-beaming bracket where fitted, tighten bolt to 45 Nm.
Alloy sump
- Clean sealing surface on sump flange using suitable solvent.
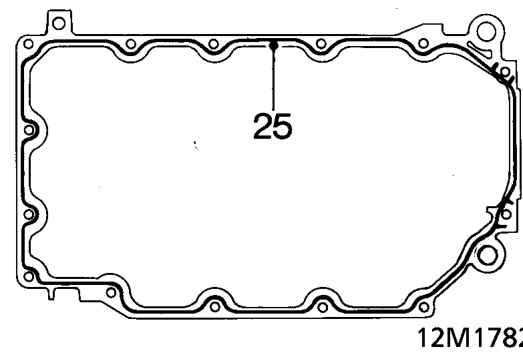
- Apply a 2 mm wide x 0.25 mm thick continuous bead of sealant, Part Number GUG 705963GM to sump flange as shown then spread to an even film using a roller.
CAUTION: To avoid contamination, assembly should be completed immediately after application of sealant. Do not use RTV or any sealant other than specified.
Parts & tools for this job For Rover Engine & gearbox overhaul
- PARTEngine gasket setSearch: Rover Engine & gearbox overhaul engine gasket set
- TOOLTorque wrenchSearch: 3/8 inch torque wrench
- TOOLFeeler gauge setSearch: feeler gauge set
Links open Amazon search results in a new tab. As an Amazon Associate I earn from qualifying purchases.