SEAT Workshop Service and Repair Manuals
HOME
FEATURES
MENU
INDEX
ABOUT US
Removing and installing clutch pedal >
< Removing
Leon Mk1
6-speed manual gearbox 02N
Clutch, control
Repairing clutch mechanism / moving_and_installing_mounting_bracket/">Removing and installing mounting bracket
Installing
Installing
Installing
–
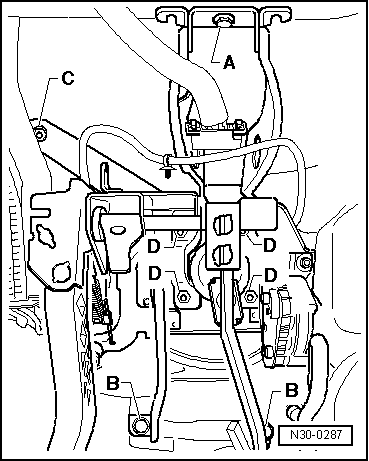
Carefully set mounting bracket on studs of brake servo from within passenger compartment.
–
Guide operating rod of brake servo into mounting bracket and insert in brake pedal.
–
Tighten hexagon nuts for brake servo
-D-
diagonally
→ Brake systems; Rep. Gr.47
.
–
Tighten upper securing bolt
-C-
for mounting bracket.
–
Tighten lower securing bolts
-B-
for mounting bracket.
–
Tighten upper securing bolt
-A-
for mounting bracket.
–
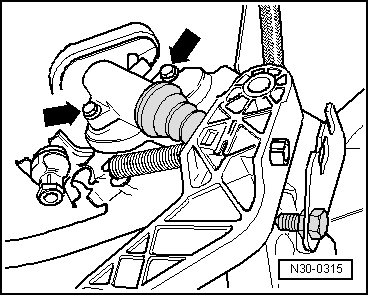
Tighten securing bolts
-arrows-
for master cylinder to specified torque
→ Item
.
–
Attach brake pedal
-2-
to brake servo
→ Brake systems; Rep. Gr.46
.
–
Connect clutch pedal to master cylinder
-1-
→ Chapter
.
–
Remove M10 bolt with nut from support for clutch pedal switch.
–
Install clutch pedal switch
-1-
→ Item
.
Note!
Observe differing notches in support for clutch pedal switch.
–
Install brake light switch
-2-
→ Brake systems; Rep. Gr.46
.
–
Install retainer
-4-
.
–
Push on connector
-3-
→ Rep. Gr.20
.
–
Install steering column
→ Running gear, axles, steering - front and four-wheel drive; Rep. Gr.48
.
–
Hook relay plate into both retainers and screw in upper fastener
→ Electrical system; Rep. Gr.97
.
–
Install dash panel trim
→ General body repairs, interior; Rep. Gr.70
.
–
Install covers on driver side
→ General body repairs, interior; Rep. Gr.68
.
–
Connect earth strap to battery.
Note!
Note radio code for vehicles with coded radio.
6-speed manual gearbox 02N
Clutch, control
Repairing clutch mechanism / moving_and_installing_mounting_bracket/">Removing and installing mounting bracket
Installing
Removing and installing clutch pedal >
< Removing

 Note!
Note!
Note!
Note!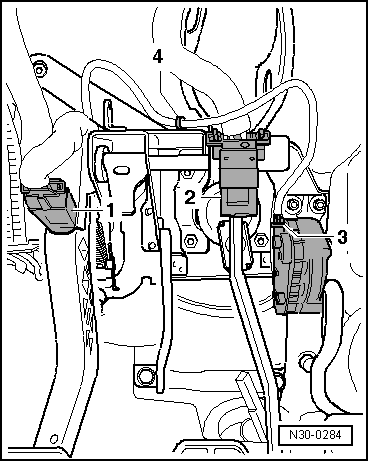
 Note!
Note!
Note!
Note!