seat Workshop Repair Guides

SEAT Workshop Service and Repair Manuals

Removing and installing rear flexible coupling > < Installing
Removing and installing rear flexible coupling
   
Removing and installing rear flexible coupling
Special tools and workshop equipment required
t  Torque wrench -V.A.G 1331/-
t  Torque wrench -V.A.G 1332/-
t  Engine and gearbox jack -V.A.G 1383 A- with
t  Universal gearbox support -V.A.G 1359/2-

A twin pillar lifting platform should be used when working on the propshaft.
  Note
Before removing, mark positions of all parts relative to each other. Reinstall in the same position. Otherwise imbalance will be excessive, and the mountings could be damaged, causing droning noises.
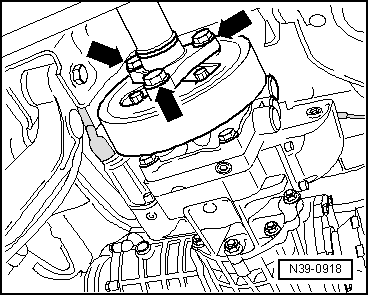
Vehicles through 08.00
   
–  Unbolt rear propshaft from rear flexible coupling -arrows-.
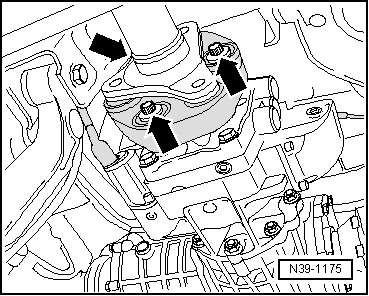
Vehicles from 09.00
–  Loosen the three connecting bolts between rear propshaft tube and flexible coupling about 2 turns.
–  Unbolt rear propshaft with flexible coupling and vibration damper from rear final drive -arrows-.
  N39-0918
Third bolt is not visible in figure.
Continuation for all vehicles
–  Remove connecting bolts between front and rear propshafts.
  N39-1175
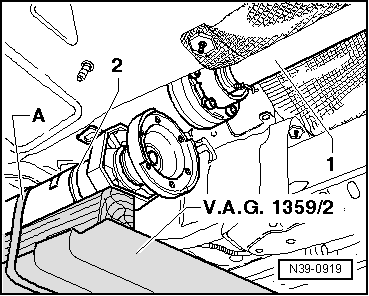
–  Tie up front propshaft tube -1-.
–  Remove centre bearing securing bolts.
–  Secure rear propshaft tube to gearbox jack -V.A.G 1383 A- and universal support -V.A.G 1359/2- against falling with belt -A-.
–  To unbolt rear flexible coupling, push rear propshaft tube forward and lay on anti-roll bar.
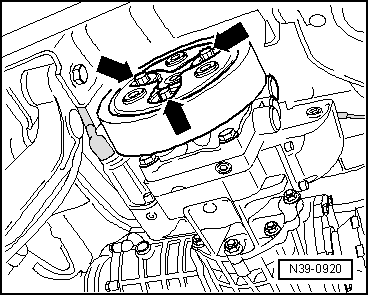
Vehicles through 08.00
  N39-0919
–  Unbolt rear flexible coupling from Haldex coupling -arrows-.
Vehicles from 09.00
–  Remove rear flexible coupling from rear propshaft.
  N39-0920

Removing and installing rear flexible coupling > < Installing