seat Workshop Repair Guides

SEAT Workshop Service and Repair Manuals

Gear selection mechanism > < Gearbox: Removing and installing
Control unit: Removing and installing
Detaching
–  Disconnect the battery earth strap.
  Note
Observe the safety measures to be adopted when disconnecting the battery → Electrical system; Rep. gr. 27
–  Remove engine cover → Booklet101.
–  Remove the air filter body, breather hose and air duct hoses → Rep. gr.24 and → Rep. gr.23 .
   
–  Remove the battery → Electrical system; Rep. gr.27.
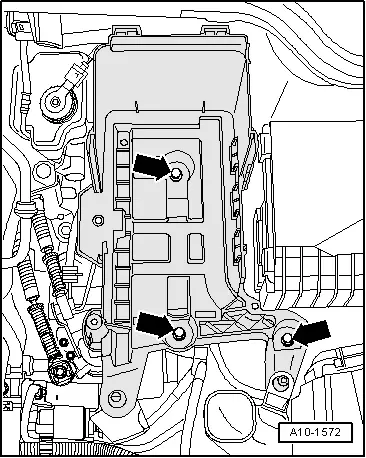
–  Remove battery tray -arrows- and remove from vehicle.
Metal idler rod
  A10-1572
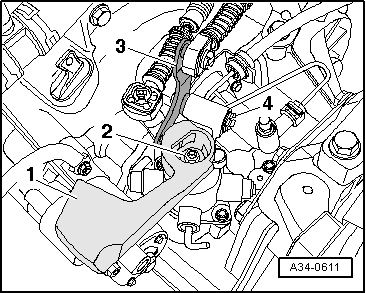
–  Detach safety clip -4- and, applying pressure, extract idler rod to one side -3-, removing it from its housing.
Plastic idler rod:
–  Remove the idler rod together with the cable fastener → Chapter
Continued for all vehicles
  A34-0611
–  Unscrew nut -2- and remove selector rod -1-.
  A34-0611
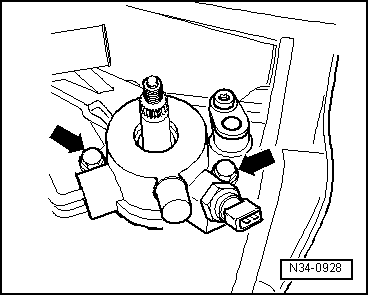
–  Move selector shaft to neutral. Next unscrew bolts -arrows- and remove selector shaft from gearbox casing.
Installing
Installation is carried out in the reverse sequence; note the following:
–  Apply sealing uniformly onto the gearbox mechanism cover sealing surface → Spare parts catalogue.
–  Move selector shaft to neutral.
–  Position the selector shaft in such a way that the gear toe is housed in the gearbox prongs.
  N34-0928
–  Screw in the gear control cover for the selector shaft -arrows-. Tightening torque → Item
–  Install selector rod → Item → Item, and idler rod
  Note
The selector rod may only be placed in one position.
–  Install battery → Electrical system; Rep. gr.27.
  N34-0928

Gear selection mechanism > < Gearbox: Removing and installing