seat Workshop Repair Guides

SEAT Workshop Service and Repair Manuals

Dismantling and assembling locking collars and synchro-hubs of output shaft 2 > < Dismantling output shaft 2
Assembling output shaft 2
Overview: Gearbox disassembly → Chapter.
Dismantling gearbox → Chapter.
Assembling gearbox → Chapter.
Dismantling and assembling clutch housing → Chapter.
Dismantling and assembling outer input shaft → Chapter.
Dismantling and assembling inner input shaft → Chapter.
Dismantling and assembling output shaft 1 - overview → Chapter.
Dismantling and assembling output shaft 2 - overview → Chapter.
Dismantling and assembling output shaft 3 - overview → Chapter.
Notes on gearbox adjustment → Chapter.
Calculating shims for clutch housing → Chapter.
Calculating shims for gearbox housing → Chapter.
Gearbox identification → Chapter.
Code, engine allocation → Chapter.
   
Special tools and workshop equipment required
t  Spanner -T10061-
t  pressure tool -VW 416B-
t  pressure tool -VW 447H-
t  pressure tool -VW 454-
t  Installing sleeve -VW 455-

During this procedure, you can see how output shaft 2 is assembled. During the following work that is performed in the press, make sure that the shaft bearing is not damaged.
If bearing is not going to be renewed then it must be protected.
l  If bearing is pressed on, thrust plate -VW 447 H- must also be used for each pressing operation.
l  Pressing off bearing: → Anchor
l  Pressing on bearing: → Anchor
   
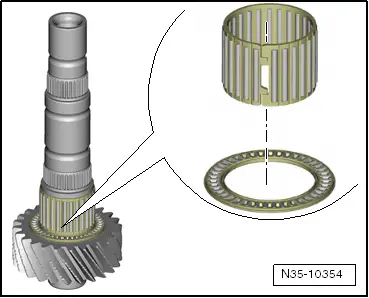
–  Place both needle bearings onto output shaft.
–  Make sure that cages are not broken.
–  Wet bearing with oil.
–  Fit reverse gear wheel.
  N35-10354
–  Put on reverse gear wheel, axial bearing »with smooth side facing upwards«.
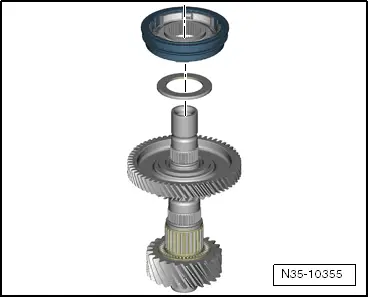
–  Put on locking collar with synchro-hub. Make sure circumferential edge of sleeve is pointing »upwards«, and collar of locking collar »downwards«.
Dismantling and assembling locking collar → Chapter.
Synchro-hub can only be put in place. It is pressed on in next step.
  N35-10355
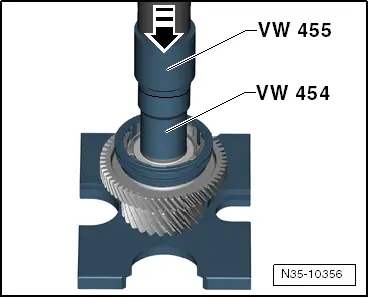
–  Press on synchro-hub. Use the installing sleeve -VW 455- and the press tool -VW 454- for this purpose.
  Note
Stop pressing immediately when you notice a rise in force during pressing. Do not continue pressing!
  N35-10356
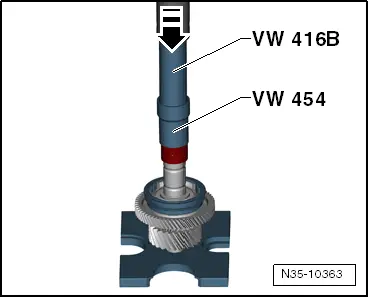
–  Press on sleeve for synchromeshed gear for 6th gear. Use the press tool -VW 416B- and the press tool -VW 454- for this purpose.
  N35-10363
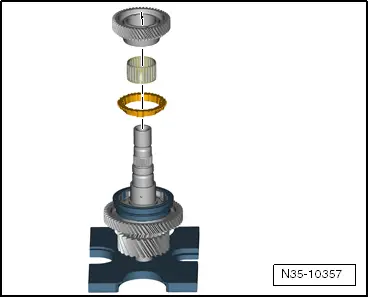
–  Put on synchro-ring, needle bearing and synchromeshed gear for 6th gear.
–  Wet bearing and friction surfaces with oil.
  N35-10357
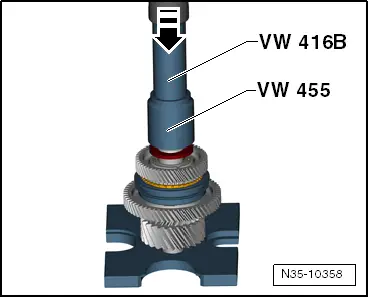
–  Press on washer for synchromeshed gear for 6th gear. Use the press tool -VW 416B- and the installing sleeve -VW 455- for this purpose.
If this washer has lettering then position this side of washer »downwards«.
  Note
t  Here too, stop pressing immediately when you notice a rise in force during pressing. Do not continue pressing!
t  After pressing, gear wheel must turn »freely« when shaft is in horizontal position.
t  Output shaft is assembled as far as this washer for purpose of adjusting shaft.
  N35-10358
Do not assemble output shaft further until gearbox has been adjusted.
  N01-0453
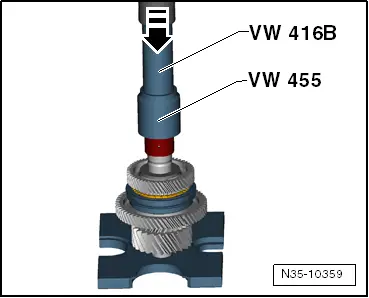
–  Press on sleeve for needle bearing of synchromeshed gear for 7th gear. Use the press tool -VW 416B- and the installing sleeve -VW 455- for this purpose.
  Note
Here too, stop pressing immediately when you notice a rise in force during pressing. Do not continue pressing!
  N35-10359
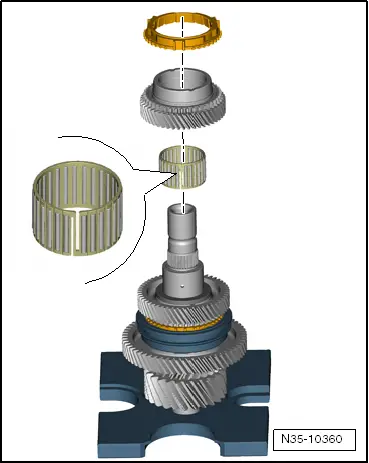
–  Put on needle bearing, synchromeshed gear for 7th gear and synchro-ring.
–  Wet bearing and friction surface with oil.
–  Put on locking collar with synchro-hub. Make sure circumferential edge of sleeve is pointing »upwards«, and collar of locking collar »downwards«.
Synchro-hub can only be put in place. It is pressed on in next step.
  N35-10360
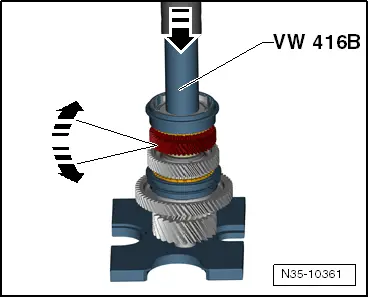
–  Press in the synchronising hub using the press tool -VW 416B-.
  Note
t  When pressing, two things must be observed:
t  Raise gear wheel and turn it at same time. This allows synchro-ring to locate its installation position before ring is clamped by synchro-hub.
t  Once ring has located its seat, pay attention to force required for pressing. Stop pressing as soon as you feel a stop (increased force requirement). Synchromeshed gear for 3rd gear must have axial play. Gear has reached its installation position as soon as force during pressing rises. If you continue pressing then you will be pressing synchro-hub against needle bearing, thus damaging it.
t  After pressing, gear wheel must turn »freely« when shaft is in horizontal position.
  N35-10361
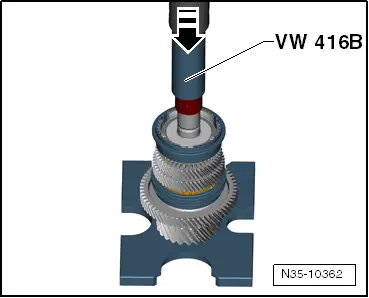
–  Press on the sleeve for needle bearing of synchromeshed gear for 5th gear using the press tool -VW 416B-.
  Note
Here too, stop pressing immediately when you notice a rise in force during pressing. Do not continue pressing!
  N35-10362
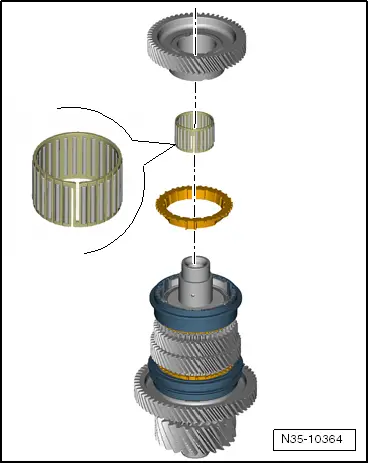
–  Put on synchro-ring, needle bearing and gear wheel for 5th gear.
–  Wet bearing and friction surface with oil.
  N35-10364
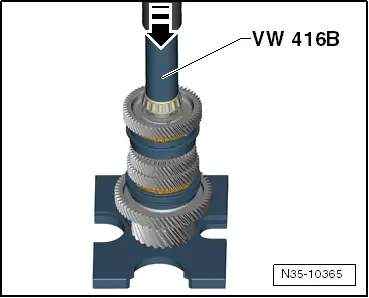
–  Press in the dished washer using the press tool -VW 416B-.
–  Wet bearing with oil.
  N35-10365
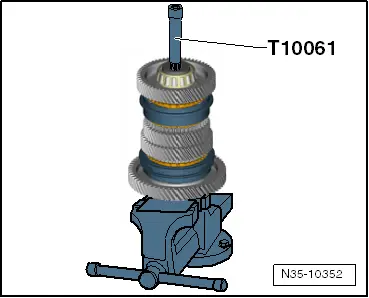
–  Tighten new bolt.
Tightening torque:
60 Nm, 90° further.
Special wrench -T10035- can also be used for tightening.
  N35-10352

Dismantling and assembling locking collars and synchro-hubs of output shaft 2 > < Dismantling output shaft 2