SEAT Workshop Service and Repair Manuals
HOME
FEATURES
MENU
INDEX
ABOUT US
Compartments, covers and trims >
< Footrest moulding (2 door vehicles): removing and fitting
Leon Mk1
Body
Bodywork, Interior fitting work / Interior equipment
Sill panel strips
Removing and installing mounting of front sill panel strip
Removing and installing mounting of front sill panel strip
Note
Removal and installation are described for the left vehicle side. Follow same instructions for the right side as appropriate.
Removing
–
Remove connecting piece between sill panel strip and luggage compartment trim
→ Chapter
.
–
Remove sill strip
→ Chapter
.
–
Remove dash panel end trim
→ Chapter
.
–
On driver's side, remove bonnet operating lever
→ General body repairs, exterior; Rep. gr.55
.
–
Remove lower A-pillar trim
→ Chapter
.
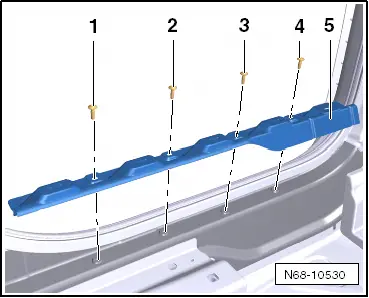
–
Undo bolts
-1-
,
-2-
,
-3-
and
-4-
.
–
Push mounting of sill panel strip
-5-
in front area in direction of middle of vehicle and remove.
Installing
–
Centre the mounting of sill panel strip
-5-
at rear end in relation to body and push in direction of side sill as far as the stop.
–
Bolt the mounting of sill panel strip to side sill in the bolting sequence
-4-
,
-1-
,
-2-
and
-3-
.
Specified torque: 2 Nm.
Body
Bodywork, Interior fitting work / Interior equipment
Sill panel strips
Compartments, covers and trims >
< Footrest moulding (2 door vehicles): removing and fitting
 Note
Note