seat Workshop Repair Guides

SEAT Workshop Service and Repair Manuals

Removing and installing trim bracket on sill side > < Removing and installing trim on sill side
Removing and installing switches
The following switches are installed in the trim on the sill side:
t  Driver seat lumbar support adjustment switch -E176-
t  Driver seat adjustment operating unit -E470-
Removing
–  Switch off ignition.
–  Remove trim on sill side → Chapter.
   
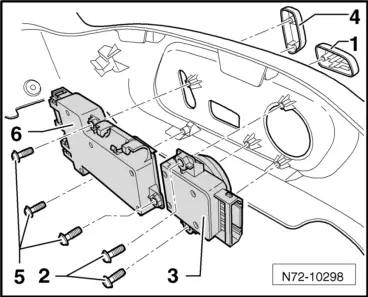
–  Carefully release button -1- from lumbar support switch -3- using release tool -T10236-.
–  Unscrew two screws -2- (1 Nm) and remove lumbar support adjustment switch -3- from trim.
–  Carefully release button -4- from seat adjustment operating unit -6- using release tool -T10236-.
–  Unscrew three screws -5- (1 Nm) and remove seat adjustment operating unit -6- from trim.
Installing
–  Install in reverse order of removal.
  N72-10298

Removing and installing trim bracket on sill side > < Removing and installing trim on sill side