seat Workshop Repair Guides

SEAT Workshop Service and Repair Manuals

Removing and installing sump > < Servicing valve gear
4-cyl. injection engine (2 valve without intermediate shaft), Mechanics
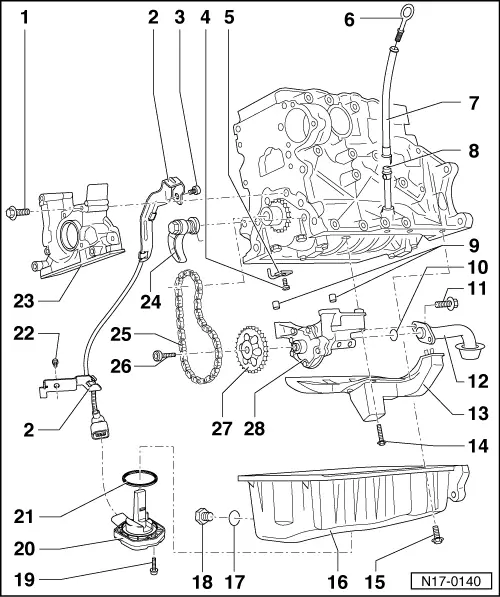
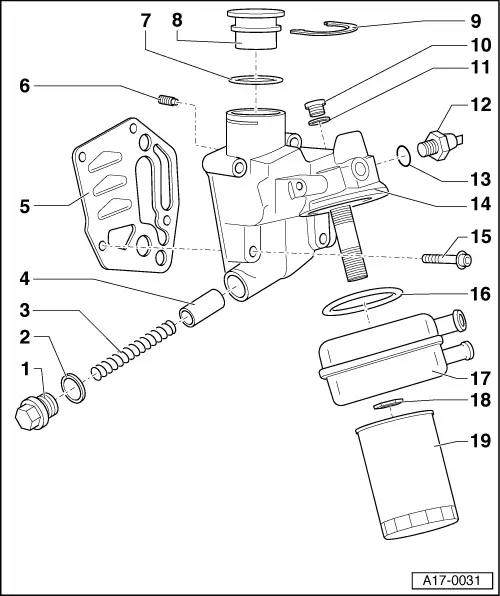
Removing and installing parts of the lubrication system

Notes:

  • ◆ If when repairing an engine, metal shavings or a large quantity of small metal particles are found, this could indicate that the crankshaft and conrod bearings are damaged. To prevent consequential damage perform the following repairs:
    • ‒ Thoroughly clean oil passages
    • ‒ Replace oil spray jets
    • ‒ Replace oil cooler
    • ‒ Replace oil filter
  • ◆ The oil level must not be above the max. mark - danger of damage to catalyst!
    Marking , Fig.1

Checking oil pressure => Page 17-16

Oil system capacity1):

    with oil filter 4.0 ltr.

    1)    Up-to-date figures:

=> Exhaust emissions test binder

Engine oil specificationswith long-life service

Use engine oils conforming to VW standard 503 00.

Notes:

  • ◆ Engines are filled at the factory with oil conforming to VW standard 503 00. This engine oil is designed for long service intervals.
  • ◆ Engine oils conforming to VW standard 500 00, 501 01 or 502 00 can be used furthermore. The oil must then be changed every 12 months or every 15,000 km and the service interval display must be programmed correspondingly. Procedure:

=> Maintenance manual

 
N17-0140

Part I

Part II Dismantling oil filter bracket

=> Page 17-9

  • 15 Nm
  • Bracket
    • ◆ Oil level/temperature sender wiring harness
  • 40 Nm
  • Pressure relief valve, 27 Nm
    • ◆ Opening pressure: 1.3...1.6 bar
  • Oil spray jet
    • ◆ For piston cooling
  • Dipstick
    • ◆ The oil level must not be above the max. mark!
    • ◆ Markings=> Page 17-8, Fig.1
 
N17-0140
  • Guide
    • ◆ For dipstick
    • ◆ Secured to intake manifold
    • ◆ Pull off to extract oil
  • Guide tube
  • Dowel sleeves
  • O-ring
    • ◆ Renew
  • 15 Nm
  • Suction pipe
    • ◆ Clean strainer if soiled
  • Baffle plate
  • 15 Nm
  • 15 Nm
 
N17-0140
  • Sump
    • ◆ Clean sealing surface before installing
    • ◆ Install with silicone sealant
      D 176 404 A2
      => Page 17-12
    • ◆ Removing and installing
      => Page 17-12
  • Seal
    • ◆ Renew
  • Oil drain plug, 30 Nm
    • ◆ Renew plug with attached seal
  • 10 Nm
  • Oil level/temperature sender (G266)
  • Seal
    • ◆ Renew
 
N17-0140
  • 40 Nm
  • Sealing flange
    • ◆ Must be located on dowel sleeves
    • ◆ Clean sealing surface before installing
    • ◆ Insert with silicone sealant
      D 176 404 A2
      => Page 13-21
    • ◆ Removing and installing
      => Page 13-21
    • ◆ Renewing crankshaft oil seal - pulley end => Page 13-17
  • Chain tensioner with tensioning rail, 15 Nm
    • ◆ When installing, pretension spring and fit
  • Chain
  • 20 Nm
  • Chain sprocket
 
N17-0140
  • Oil pump
    • ◆ With pressure relief valve of 12 bar
    • ◆ Before installing, check that both dowel sleeves for centralizing oil pump/cylinder head are fitted
    • ◆ Renew if running surfaces and gears are scored
 
N17-0037

→ Fig. 1    Markings on oil dipstick

  •     1 -    max. mark
  •     2 -    min. mark
  •     a -    Area above hatched field up to max. mark: Do not replenish with engine oil!
  •     b -    Oil level within hatched field: can be replenished with engine oil
  •     c -    Area from min. mark up to hatched field: replenish with max. 0.5 ltr. of engine oil!
 
A17-0031

Part II

  • Sealing plug, 40 Nm
    • ◆ Renew
  • Seal
    • ◆ Fits firmly on item 1
  • Spring
    • ◆ For pressure relief valve, approx. 4 bar
  • Piston
    • ◆ For pressure relief valve, approx. 4 bar
  • Gasket
    • ◆ Renew
  • Non-return valve, 8 Nm
  • Seal
    • ◆ Fit onto sealing cap shoulder -item 8-
 
A17-0031
  • Sealing cap
  • Retaining clip
    • ◆ Check for tight fit
  • Sealing plug, 15 Nm
  • Seal
    • ◆ If sealing ring is leaking nip open and replace.
  • 1.4 bar oil pressure switch (F1), 25 Nm
    • ◆ Black
    • ◆ Checking => Page 17-16
  • Seal
    • ◆ If sealing ring is leaking nip open and replace.
  • Oil filter bracket
  • 15 Nm + 1/4 turn (90 °) further
    • ◆ Renew
 
A17-0031
  • Gasket
    • ◆ Renew
    • ◆ Fit into groove on oil cooler
  • Oil cooler
    • ◆ Ensure clearance to adjacent components
    • ◆ See note
      => Page 17-1
  • 25 Nm
  • Oil filter
    • ◆ Loosen with strap wrench
    • ◆ Tighten by hand
    • ◆ Observe installation instructions on oil filter
    • ◆ See note
      => Page 17-1

Removing and installing sump > < Servicing valve gear