seat Workshop Repair Guides

SEAT Workshop Service and Repair Manuals

Checking oil pressure and oil pressure switch > < Removing and installing parts of the lubrication system
4-cyl. injection engine (2 valve without intermediate shaft), Mechanics
Removing and installing parts of the lubrication system
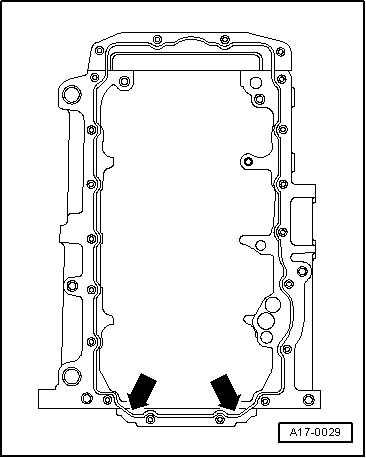
Removing and installing sump

Special tools, workshop equipment, testers, measuring instruments and auxiliary items required

  • ◆ Hand drill with plastic brush
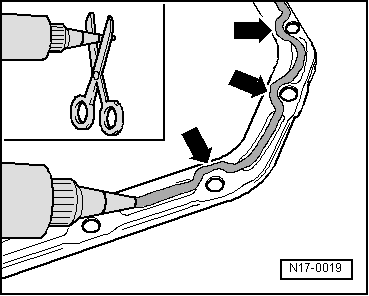
  • ◆ Silicone sealant D176404 A2
  • ◆ Protective glasses
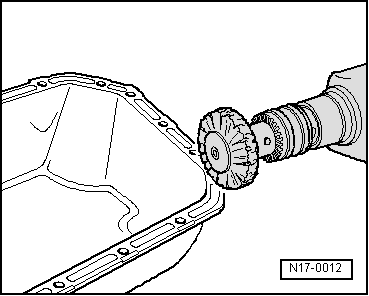
  • ◆ Flat scraper

Removing

  • ‒ Remove noise insulation tray.
  • ‒ Drain engine oil.

Note:

Observe disposal regulations!

  • ‒ Pull 3-pin connector off oil level/temperature sender (G266).
  • ‒ Remove sump, it may be necessary to release sump by tapping lightly with a rubber head hammer.
  • ‒ Remove sealant residue on cylinder block with a flat scraper.
 
N17-0012
  • ‒ → Remove sealant residue on the sump with a rotating brush, e.g. a hand drill with a plastic brush (wear eye protection).
  • ‒ Clean sealing surface, must be free of oil and grease.

Installing

Notes:

  • ◆ Note the use by date of the sealant.
  • ◆ Sump must be installed within 5 minutes of applying silicone sealing compound.
 
N17-0019
  • ‒ → Cut off tube nozzle at forward marking (nozzle approx. 3 mm ø).
  • ‒ Apply silicone sealing compound, as shown, to clean sump sealing surface. Sealing compound bead must be.
    • ‒ 2...3 mm thick.
    • ‒ and run on inside of bolt holes -arrows-.

Note:

The sealing compound bead must not be thicker, otherwise excess sealing compound will enter the sump and may block the oil suction pipe strainer.

 
A17-0029
  • ‒ → Apply silicone sealing bead as shown to the clean sealing surface of the sump. (The illustration shows the position of the sealant bead on the cylinder block).
  • ‒ Install sump immediately and tighten bolts as follows:
  •     1 -    Tighten all bolts sump/cylinder block very lightly and diagonally.
  •     2 -    Lightly tighten three bolts sump/gearbox.
  •     3 -    Lightly tighten all bolts sump/cylinder block diagonally.
  •     4 -    Tighten three bolts sump/gearbox to 40 Nm.
  •     5 -    Tighten all bolts sump/cylinder block diagonally to 15 Nm.

Notes:

  • ◆ When installing the sump on an engine which is out of vehicle, ensure that the sump is flush with cylinder block on flywheel end.
  • ◆ The sealant must be allowed to drive approx. 30 minutes after fitting the sump. Only then can the engine be filled with engine oil.

The rest of the assembly is basically a reverse of the dismantling sequence.

Checking oil pressure and oil pressure switch > < Removing and installing parts of the lubrication system