seat Workshop Repair Guides

SEAT Workshop Service and Repair Manuals

Removing and installing sealing flanges and flywheel/drive plate > < Dismantling and assembling pistons and conrods
6-cyl. fuel injection engine, Mechanics
Dismantling and assembling engine
Adjusting valve timing

(Timing chains removed)

Special tools, testers and auxiliary items

  • ◆ Counter-hold tool VW 558
  • ◆ Camshaft setting bar 3268
  • ◆ Hexagon bolt M8x20 with hexagon nut
  • ◆ V.A.G 1331 Torque wrench (5...50 Nm)
 
V13-1052
  • ◆ Torque wrench V.A.G 1332 (40 - 200 Nm)

Work sequence

Engine removed

Install single chain and chain tensioner with tensioning plate:

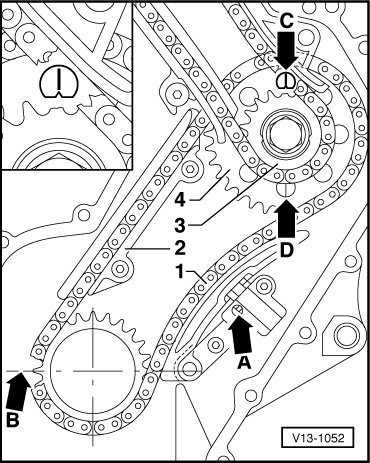
  • ‒ → Set/check position of crankshaft to intermediate shaft.
        Ground down tooth on crankshaft sprocket -B-
        must align with the main bearing joint (TDC No. 1 Cyl.).
  • ‒ Install pin without collar for guide rail -2- and tighten to
        25 Nm.
 
V13-1052
  • ‒ → Install guide rail -2- with single chain -1- and both sprockets -3- and -4- (note D.O.R. of single chain , Fig.1)
        The marking on single chain sprocket -4-
        must align with the notch -C- or -D- on the
        thrust washer.
  • ‒ Release locking spline in chain tensioner with a small screwdriver -A-.
  • ‒ Press chain tensioner against tensioner plate and tighten chain tensioner to
        10 Nm.

Vehicles with manual gearbox

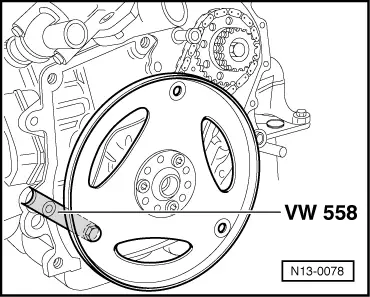
  • ‒ Tighten flywheel to crankshaft with 3 old bolts and counter-hold with VW 558.

Vehicles with automatic gearbox

  • ‒ Secure drive plate to crankshaft with 3 old bolts.
 
N13-0078
  • ‒ → Secure counter-hold tool VW 558 behind the drive plate with a hexagon bolt M8x20.

Continuation for all vehicles

 
V13-1052
  • ‒ → Tighten intermediate shaft sprockets 3 and 4
        100 Nm.
  • ‒ Remove flywheel/drive plate and check position of crankshaft to intermediate shaft.

Install double chain and chain tensioner with tensioning plate:

 
V15-0819
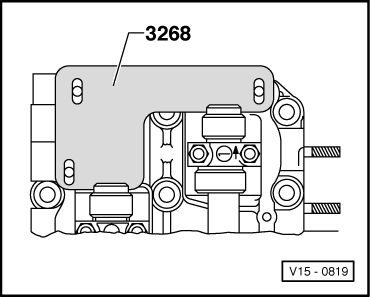
  • ‒ → Locate camshafts with camshaft jig 3268.
  • ‒ Install tensioning plate pivot pins and tighten to
        25 Nm.
  • ‒ Install tensioning plate for chain tensioner (camshaft chain).
  • ‒ Install locating pin with collar for guide rail and tighten to
        25 Nm.

Note:

With cylinder head removed:

  • ‒ Installing cylinder head .
  • ‒ Place guide rail on locating pin. Insert short securing bolt with locking fluid "D6" and tighten both bolts to
        20 Nm.
  • ‒ Place camshaft chain on intermediate shaft. (Note D.O.R. of chain
    => Page 13-7, Fig.1).
  • ‒ Fit camshaft sprocket and chain to camshaft for cylinder bank 2, 4 and 6 (short camshaft) and tighten by hand.
  • ‒ Fit camshaft sprocket (with sender wheel for Hall sender) and chain to camshaft for cylinder bank 1, 3 and 5 and tighten by hand.

Notes:

  • ◆ Contact surface of timing chain and sender wheel must be dry when installing.
  • ◆ Oil head contact surface of bolts when installing.
  • ‒ Remove camshaft jig 3268.
 
N15-0045
  • ‒ Tighten securing bolts for camshaft sprockets to
        100 Nm.

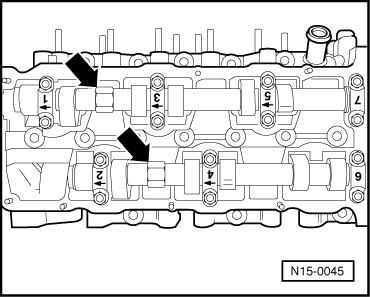
→ Note:

Only counter-hold with 24 mm open jaw spanner on the camshaft -arrow-. The camshaft jig must not be fitted when tightening/loosening the sprockets.

  • ‒ Coat sealing surface of sealing flange with AMV 188 001 02 and install. Tighten securing bolt to
        10 Nm.
  • ‒ Replace sealing flange oil seal
    => Page 13-37, removing and installing sealing flange and flywheel/drive plate.
  • ‒ Prepare cylinder head gasket for assembly
    => Page 15-9, Fig. 2
  • ‒ Coat camshaft sprocket cover sealing flange with AMV 188 001 02.
  • ‒ Oil O-ring (=> Page 13-10, Pos.12) and insert in camshaft sprocket cover.
  • ‒ Install camshaft cover, insert all securing bolts and tighten lightly.
  • ‒ First tighten M8 securing bolt to
        25 Nm
    then M6 securing bolts to
        10 Nm.
  • ‒ Install chain tensioner for camshaft chain and tighten to
        30 Nm.

Notes:

  • ◆ If the chain tensioner has been pulled apart (for double chain), bleed chain tensioner before installing
    , Fig. 3
 
N13-0081
  • ◆ Only turn engine with chain tensioner installed! Otherwise single or double chain will jump over!
  • ‒ Turn crankshaft two full turns in engine D.O.R. and check valve timing => Page 13-25.

Engine installed, cylinder head removed

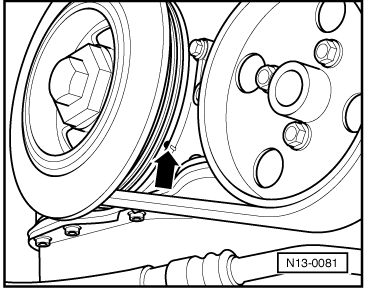
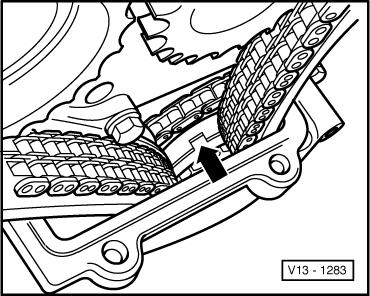
  • ‒ → Set crankshaft to TDC No. 1 Cyl. marks -arrow- by turning crankshaft on the vibration damper securing bolt in engine D.O.R.:

 
V13-1283

→ If the TDC No. 1 Cyl. setting is correct it is possible to see a notch on the intermediate shaft sprockets -arrow-.

If the notch cannot be seen:

  • ‒ Turn crankshaft one full turn in engine D.O.R.

Note:

If the crankshaft is turned with the cylinder head removed, a 2nd mechanic should guide the double chain by hand to prevent it jamming.

 
V15-0819
  • ‒ → Locate camshafts with camshaft jig 3268.
  • ‒ Prepare cylinder head gasket for assembly
    => Page 15-9, Fig. 2
  • ‒ Install cylinder head => Page 15-13
  • ‒ Place guide rail on locating pin. Insert short securing bolt with locking fluid "D6" and tighten bolts to
        20 Nm.
  • ‒ Fit camshaft sprocket and chain to camshaft for cylinder bank 2, 4 and 6 (short camshaft) and tighten by hand.
  • ‒ Install camshaft sprocket (with sender wheel for Hall sender) and chain on camshaft for cylinder bank 1, 3 and 5 and tighten by hand.

Notes:

  • ◆ Contact surface of timing chain and sender wheel must be dry when installing.
  • ◆ Oil head contact surface of bolts when installing.
  • ‒ Remove camshaft jig 3268.
  • ‒ Tighten securing bolts for camshaft sprockets to
        100 Nm.
 
N15-0045

→ Note:

Only counter-hold with 24 mm open jaw spanner on the camshaft -arrow-. The camshaft jig must not be fitted when tightening/loosening the sprockets.

  • ‒ Coat sealing surface of sealing flange with AMV 188 001 02.
  • ‒ Oil O-Ring (=> Page 13-10, Pos.12) and insert in camshaft sprocket cover.
  • ‒ Install camshaft cover, insert all securing bolts and tighten lightly.
  • ‒ First tighten M8 securing bolt to
        25 Nm
    then M6 securing bolts to
        10 Nm.
  • ‒ Install chain tensioner camshaft chain and tighten to
        30 Nm.

Notes:

  • ◆ If the chain tensioner has been pulled apart, bleed chain tensioner before installing
    , Fig. 3
  • ◆ Only turn engine with chain tensioner installed! Otherwise single or double chain will jump over!
  • ‒ Turn crankshaft two full turns in engine D.O.R. and check valve timing => Page 13-25.

Removing and installing sealing flanges and flywheel/drive plate > < Dismantling and assembling pistons and conrods