seat Workshop Repair Guides

SEAT Workshop Service and Repair Manuals

Final drive, differential, differential lock > < Identification of the rear final group
General repair instructions
Repair work on the final group must be carried out with greatest care and cleanliness possible, using tools that are in perfect condition. Naturally, the customary basic safety rules must be observed during repair work.
A series of instructions applicable to all repair processes is given below:
Rear final group
t  If the rear final group is replaced, check the oil level of the Haldex clutch and the final group, and top off → Chapter.
t  Filling amounts → Chapter .
t  Types of oil → Parts catalogue.
t  Clean contact surfaces on fitting blocks, supports or waxed components. The surfaces must be completely free from wax or grease.
Fault finding
   
t  Before carrying out repairs on the Haldex clutch, determine the cause of the fault by using the “Guided fault finding”, the “Vehicle self-diagnosis” or the “Measurement module”of the central diagnosis -VAS 5051B- or the central diagnosis -VAS 5052-.
O-rings, seals, gaskets
t  O-rings, seals and gaskets must always be replaced.
t  Thoroughly clean contact surfaces.
Before assembly:
  W00-10343
t  Lightly lubricate the outside diameter of the shaft radial seals before installing them. Refill the space between the sealing lips -arrow- with grease → Parts catalogue.
t  Before installing the radial seals for the Cardan shaft flange, lightly lubricate the outside diameter and the space between the sealing lips with high performance oil for Haldex clutches → Parts catalogue.
t  The open side of the seals should face the liquid to be retained.
After assembly:
t  Check the rear final group oil level → Chapter.
t  Check the Haldex clutch oil level → Chapter.
Safety catches
t  Do not over-expand safety rings.
t  Always replace damaged or over-expanded safety rings.
t  Safety rings must be well seated in the groove.
  N32-0001
t  
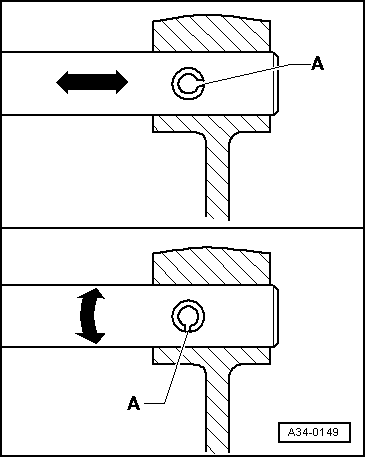
Replace the support sleeves. Installation position: the groove-A- must remain parallel to the direction of the flow of pressure -arrow-.
Bolts, nuts
t  Loosen and tighten nuts and bolts on covers and casings in diagonal sequence.
t  Do not bend the parts, especially fragile parts; loosen and tighten them in stages in diagonal sequence.
t  The torque settings refer to non-lubricated nuts and bolts.
t  Always replace any self-locking nuts and bolts.
t  Contact surfaces, bolts and nuts for all threaded joints must be waxed when fitted if necessary.
Bearings
t  
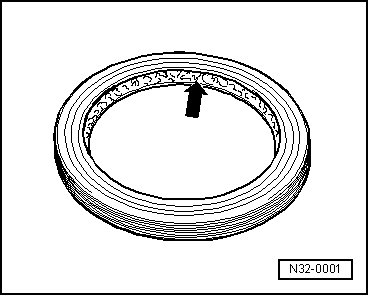
The needle bearings must be inserted with the engraved part (thicker side of the plate) facing towards the installation tool.
t  All bearings of the gearbox must be fitted lubricated with sprocket oil.
t  Conical roller bearings fitted into one same shaft must be replaced together. If possible, use parts from the same manufacturer.
t  Before fitting interior rings, heat them to approx. 100 °C.
t  Do not confuse the outside and inside rings of the bearing with the rings from other bearings of the same size. The bearings come in matched pairs.
Shims
t  Check shim settings at various points, using a micrometer. The existence of different tolerances allows the exact calibration of the thickness of the shim needed.
t  Check they have no lips and that they are not damaged.
t  Only fit shims in perfect condition.
  A34-0149

Final drive, differential, differential lock > < Identification of the rear final group