seat Workshop Repair Guides

SEAT Workshop Service and Repair Manuals

Replacing the compressor pulley > < Connectors for the Air conditioning control unit J301
Evaporator: removing and installing
–  Remove air conditioner unit → Chapter.
–  Remove the electrical components of the air conditioning unit → Chapter.
–  Remove air conditioner unit → Chapter.
–  Dismantle the evaporator housing → Chapter.
   
–  Extract the evaporator -A- from the lower element of the evaporator housing.
  Note!
t  Before fitting evaporator, check and if necessary clean condensate drain.
t  Clean the evaporator housing ( and, if necessary the evaporator) before fitting the evaporator.
  A87-0715
–  When fitting the evaporator -A- note the lower section and when fitting the two housing elements, protect the seal -F-.
  A87-0715
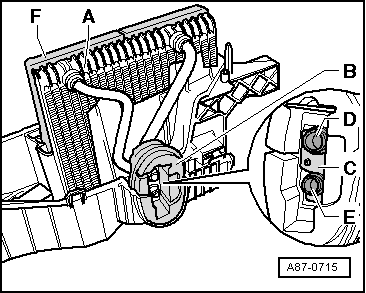
–  Check the seal -F- before fitting the evaporator (must be secured all around).
–  Fit the support -C- and the seal / insulation -B- onto the connection tubes of the evaporator -D- and -E-.
–  Fit the evaporator -A- as shown in the illustration to the lower evaporator housing element.
  Note!
t  Check following the fitting, the two parts of the housing, the correct positioning of the seal / insulation -B- in the passage for the two coolant tubes -D- and -E-.
t  Check the correct seating of the support -C- on the two coolant tubes -D- and -E-.
t  When the protective thermal insulation -B- is not fitted or there is not enough then there may be reduced performance from the air conditioning (modification of the characteristic regulation curve due to heat radiation).
t  Inside the evaporator that has been removed, there is refrigeration oil that must be added to the refrigeration circuit (with the new evaporator) → Air conditioning - with refrigerant R134a SEAT.
  A87-0715

Replacing the compressor pulley > < Connectors for the Air conditioning control unit J301