
Leon Mk1
|
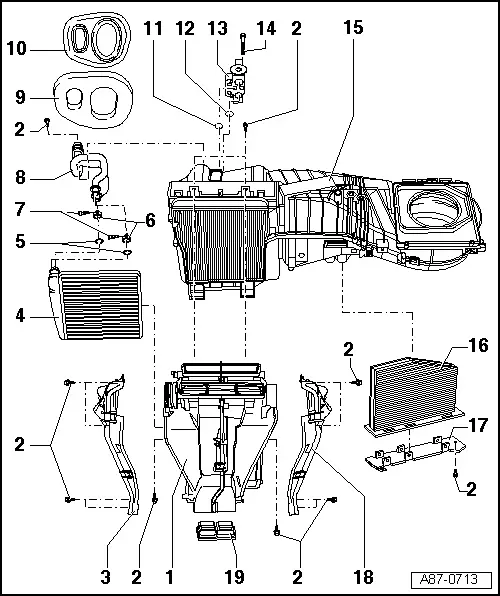
| 1 - | Air distribution housing for air conditioner |
| q | Do not dismantle any further |
| q | In vehicles without heater element for additional air heating -Z35- the opening for the heater element for additional air heating -Z35- is blocked by the cover of the heat exchanger. |
| q | Lightly grease the support points and the temperature flap guides (for example using G 052 745 A3). |
| q | Different versions in vehicles with manual and automatic climate control → Parts catalogue |
| q | The air distribution casing in vehicles with manual climate control has gears with a cam disk for operating the air distribution flaps. Do not detach this gear mechanism as the setting cannot be re-established. |
 Note
Note| t | On vehicles with manually controlled air conditioner, the air distribution flaps are moved manually via a flexible shaft. On vehicles with automatic air conditioner, air distribution flaps are actuated by different control motors. |
| t | On vehicles with manually controlled air conditioner, the temperature flaps (right and left) are linked via the shaft and actuated by a control motor. On vehicles with an automatic air conditioner, the left and right temperature flaps are actuated by separate control motors. |
| 2 - | Bolt. |
| 3 - | Air duct to footwell vent (left-side) |
| q | Version „Air conditioning“ |
| 4 - | Heat exchanger for heater |
| q | Detaching and attaching → Chapter |
| 5 - | Seal ring |
| q | Renew |
| q | Coat lightly with coolant and fit in correct position. |
| 6 - | Clip |
| q | Renew |
| q | Check for secure seating. |
| 7 - | Bolt. |
| q | Tightening torque: 2.5 Nm |
| 8 - | Coolant pipes |
| q | Detaching from and attaching to heat exchanger → Chapter |
| 9 - | Foam spacer |
| q | Fitted between grommet and air conditioning unit |
| 10 - | Grommet |
| q | Before fitting the air conditioning unit, fit this in the transversal panel of the vehicle → Chapter |
| q | Installing → Chapter |
| 11 - | O-ring |
| q | Renewing → Chapter |
| q | Allocation: → Parts catalogue |
| 12 - | O-ring |
| q | Renewing → Chapter |
| q | Allocation: → Parts catalogue |
| 13 - | Expansion valve |
| q | Detaching and attaching refrigerant pipes → Chapter |
| q | Detaching and attaching → Chapter |
| 14 - | Bolt. |
| q | Tightening torque: 10 Nm |
| q | Detaching and attaching → Chapter |
| 15 - | Evaporator housing |
| q | Dismantling and assembling → Chapter |
| 16 - | Dust and pollen filter |
| q | Detaching and attaching → Chapter |
| q | Heed replacement intervals → Booklet101 |
| 17 - | Cover for dust and pollen filter |
| q | Detaching and attaching → Chapter |
| 18 - | Air duct to footwell vent (right-side) |
| q | Version „Air conditioning“ |
| 19 - | Sealing plug |
| q | Only fitted to vehicles without air duct to rear vent of the centre console. |