seat Workshop Repair Guides

SEAT Workshop Service and Repair Manuals

Gearbox mechanics,operation, construction,diff. > < Servicing clutch control
5-speed manual gearbox 006
Servicing clutch
Servicing clutch
 
N30-0093

Modifications to clutch for vehicles with 1.8 ltr. - 110 kW engine and 1.9 ltr. - 81 kW turbo diesel engine =>Page 30-26

(Gearbox removed)

Notes:

  • ◆ Before replacing the clutch and pressure plate note fault finding transmission No.9 - Defects on the clutch and clutch mechanism
  • ◆ Replace clutch plates and pressure plates with damaged or loose rivets
  • ◆ Allocate clutch plate and pressure plate according to electronic parts catalogue (ETKA) and engine code
  • Flywheel
    • ◆ Ensure centring pins are a tight fit
    • ◆ Contact surface for clutch lining must be free of grooves, oil and grease
    • ◆ Removing and installing

=> Repair group13

 
N30-0093
  • Clutch plate
    • ◆ => Electronic parts catalogue (ETKA)
    • ◆ Note installation position, spring cage faces to pressure plate
    • ◆ Centring => Fig.1
    • ◆ Lightly grease splines

Note:

Clean input shaft splines and on used clutch plates, the hub splines. Remove corrosion and apply only a very thin coating of grease Part No: G 000 100 to the input shaft splines. Then move clutch plate to and fro on input shaft until hub moves freely on shaft. Excess grease must be removed.

 
N30-0093
  • Pressure plate
    • ◆ Removing and installing => Fig.1
    • ◆ Check ends of diaphragm spring
      => Fig.2

Note:

Pressure plates are protected against corrosion and greased. Only the contact surface may be cleaned, otherwise the service life of the clutch will be considerably reduced.
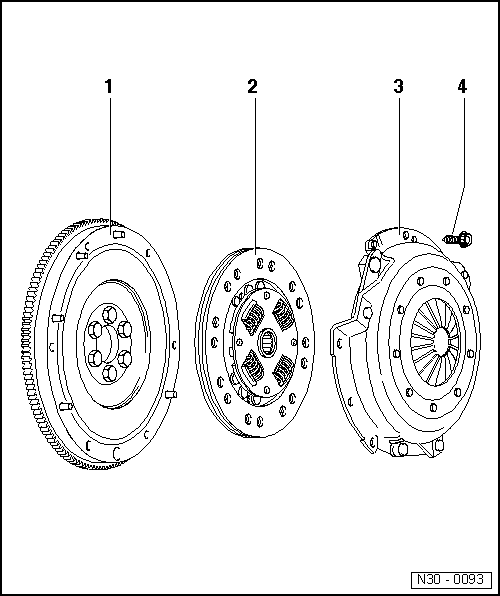
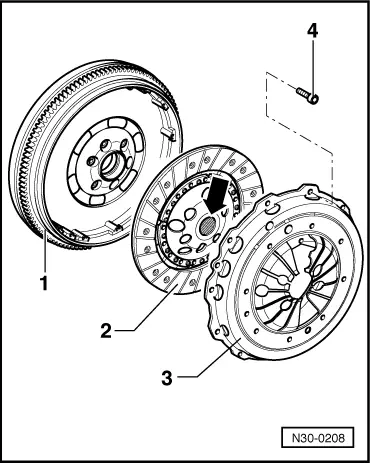
  • Bolt, 25 Nm
    • ◆ Loosen and tighten gradually and diagonally
 
N30-0118

→ Fig.1    Centring clutch plate and removing and installing pressure plate

  • ‒ Loosen and tighten bolts gradually and diagonally.
  • ‒ Reverse position of retainer 3067 when removing.

Note:

The pressure plate contact surface and the clutch plate lining must make full contact with the flywheel. Tighten securing bolts diagonally and evenly so as to prevent damage to the pressure plate centralizing hole and the flywheel centralizing pins.

 
V30-0094

→ Fig.2    Checking ends of the diaphragm spring (arrows)

  • ● Wear up to half the thickness of the diaphragm spring is permitted.

For vehicles with 1.8 ltr. - 110 kW engine and 1.9 ltr. - 81 kW turbo diesel engine the clutch and the tightening torque have been modified:

 
N30-0208

Clutch

  • ◆ → A twin mass flywheel -1- has been fitted to the above-mentioned engines.
  • ‒ Removing and installing flywheel

=> Repair group 13

  • ◆ The clutch plate -2- has a diameter of 219 mm.

Installation position:

The shorter end of the hub (arrow) faces to pressure plate -3-.

  • ◆ The pressure plate -3- is attached to flywheel with multi point socket head bolts -4-.

Tightening torque

Pressure plate multi point socket head bolts -4- to flywheel: 13 Nm.

  • ‒ Removing and installing clutch plate =>Page 30-25

Gearbox mechanics,operation, construction,diff. > < Servicing clutch control