SEAT Workshop Service and Repair Manuals
HOME
FEATURES
MENU
INDEX
ABOUT US
Engine: fixing to the trestle >
< Removing: instructions
Leon Mk1
Power unit
3-cyl. diesel engine, mechanics
Engine assy,cylinder block,crankcase / Engine: Removing and installing / moving_instructions/">Removing: instructions
Vehicles with air conditioning
Vehicles with air conditioning
Vehicles with air conditioning
–
Bear in mind the additional instructions and installation work
→ Chapter
–
Remove the lockholder plate and the accessory parts:
→ Bodywork-Installation work; Rep. Gr.50
–
Remove all the wiring from the gearbox, alternator and starter motor and leave them out in the open.
–
Remove all other necessary wiring from the engine and leave it out in the open.
–
Detach the vacuum and breather hoses and from the engine.
–
Remove the shift control from the gearbox:
→ 5-speed manual gearbox 02J; Rep. Gr.34
–
Hydraulic clutch slave cylinder (pump): removing
→ 5-speed manual gearbox 02J; Rep. Gr.30
Note!
Do not depress the clutch pedal.
–
Remove the front exhaust pipe from the turbocompressor.
–
Remove the Poly-V belt
→ Chapter
.
–
Unbolt the gearbox swing support
-1-
.
–
Remove the articulated half-shafts from the gearbox:
→ Running gear, axles, steering; Rep. Gr.40
–
Detach and remove the connection line between the intercooler and the exhaust turbocompressor next to the oil sump.
–
Remove the power steering vane pump from its support and place it on its side; the hoses remain connected.
→ Running gear, axles, steering; Rep. Gr.48
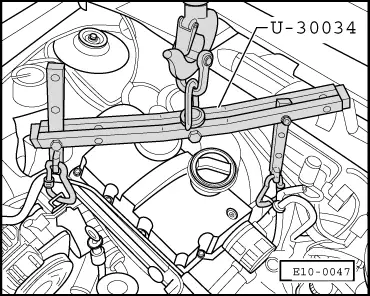
–
Attach coupling unit -U-30034- as shown in the illustration and raise slightly with shop lift -V.A.G. 1202 A-.
Caution
Check that the hooks are closed with the safety catches.
–
Loosen the bolts that hold the engine unit to the gearbox and engine supports
-arrows-
.
–
Lower the engine unit until it is out of the gearbox housing.
–
Remove the engine unit forwards, turning it and then lowering it slightly.
Note!
Handle the engine unit very carefully when removing it from the vehicle to avoid damaging the bodywork.
Power unit
3-cyl. diesel engine, mechanics
Engine assy,cylinder block,crankcase / Engine: Removing and installing / moving_instructions/">Removing: instructions
Vehicles with air conditioning
Engine: fixing to the trestle >
< Removing: instructions
 Note!
Note!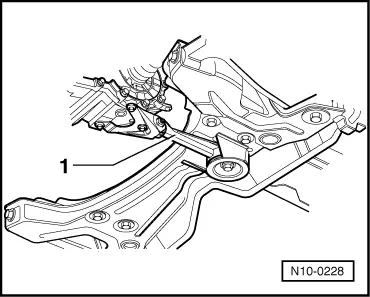
 Caution
Note!
Caution
Note!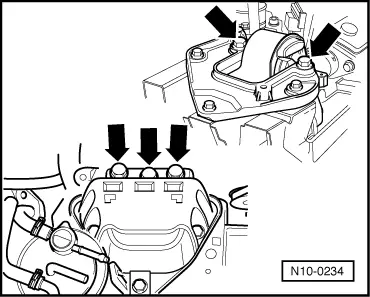
 Note!
Note!
Note!
Note!