
Leon Mk1
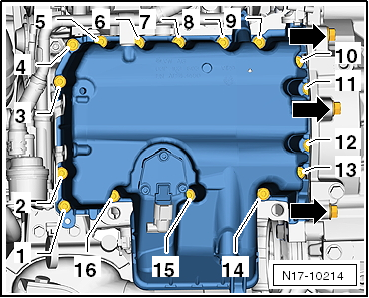
| Assembly overview - parts of lubrication system |

| 1 - | cylinder block |
| 2 - | Seal |
| q | Replace |
| 3 - | Oil filter bracket |
| q | With engine bracket |
| q | Dismantling and assembling → Chapter. |
| q | Checking engine oil cooler for leaks → Chapter |
| 4 - | Bolt. |
| q | Replace |
| q | 14 Nm and then turn 180° further |
| q | First fit upper left and lower right bolts and then tighten all four bolts diagonally. |
| 5 - | Oil dipstick |
| q | Oil level must not be above max. mark on dipstick! |
| q | Marks → Chapter |
| 6 - | Bolt. |
| q | 10 Nm |
| 7 - | Bolt. |
| q | 10 Nm |
| 8 - | Noise insulation |
| 9 - | O ring |
| q | Replace |
| 10 - | Oil level/oil temperature sender -G266- |
| q | Black connector, 3-pin |
| q | removing and fitting → Chapter |
| 11 - | Bolt. |
| q | 10 Nm |
| 12 - | Oil sump screws |
| q | 15 Nm |
| q | Tighten the bolts in 3 stages → Fig. |
| 13 - | Oil drain plug |
| q | 30 Nm |
| 14 - | Oil pan |
| q | Clean sealing surface before installing |
| q | Install with silicone sealant -D 176 501 A1- → Chapter. |
| 15 - | Bolts for the cover |
| q | 5 Nm |
| 16 - | Cover |
| q | Clean if dirty |
| 17 - | Balance shaft assembly with oil pump |
| q | removing and fitting → Chapter |
| 18 - | Tighten sealing flange bolts |
| q | 15 Nm |
| q | First fit upper left and lower right bolts and then tighten all four bolts diagonally. |
| 19 - | Sealing flange |
| q | With shaft seal |
| q | Must sit on dowel sleeves |
| q | removing and fitting → Chapter |
| q | Do not additionally oil or grease the oil seal sealing lip. |
| q | Before fitting, clean the remains of oil on the crankshaft journal using a clean cloth. |
 Note
Note
|
|
| stage: | Bolts | Tightening torque |
| 1. | -1 … 20- | Diagonally, 5 Nm |
| 2. | -Arrows - | 40 Nm |
| 3. | -1 … 20- | Tighten in stages and in diagonal sequence; final torque 13 Nm. |