seat Workshop Repair Guides

SEAT Workshop Service and Repair Manuals

Removing and installing parts of fuel supply system > < Electronic power control (EPC) (electronic accelerator)
Checking fuel tank breather
   
Checking fuel tank breather
Special tools and workshop equipment required
t  Vacuum tester -V.A.G 1368-
t  Adapter -SAT 1368/1-
t  Hand vacuum pump -SAT 1390-

Test sequence
   
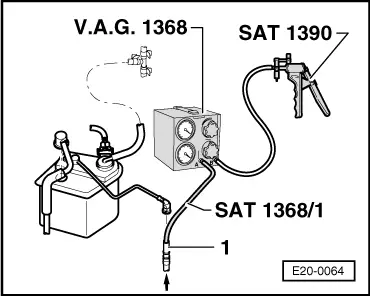
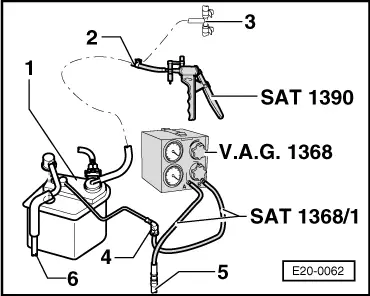
–  Pull breather pipe -2- off activated charcoal filter canister -1- at T-piece -3-.
–  Connect hand vacuum pump -SAT 1390- to pipe -2-.
–  Pull breather pipe -5- to activated charcoal filter canister off fuel tank and connect to vacuum tester -V.A.G 1368- -connection A-. Use adapter -SAT 1368/1-.
–  Connect vacuum tester -V.A.G 1368- -connection B- to breather pipe -4- to activated charcoal filter canister. Use adapter -SAT 1368/1-.
–  Set vacuum tester to position -B-.
–  Initiate final control diagnosis and select tank breather (vent) valve -N80- → Diagnostics operations unitVAS 5051
–  Operate hand vacuum pump -SAT 1390- several times. A vacuum must not build up.
If vacuum builds-up:
–  Check breather connection -6- on activated charcoal filter canister -1- for soiling, clean if necessary.
If vacuum does not build up:
–  Remove fuel filler cap.
  E20-0062
–  Connect hand vacuum pump -SAT 1390- to vacuum tester -V.A.G 1368- -connection B-.
–  Set vacuum tester to -A/B- position.
–  Operate hand vacuum pump -SAT 1390- several times. Vacuum must not build up.
If vacuum builds-up:
–  Check gravity valve → Item.
–  Check pipe/hose -1- from fuel tank for blockage.
If vacuum does not build up:
–  Refit fuel filler cap.
–  Operate hand vacuum pump -SAT 1390- several times. Vacuum must not build up.
  Note!
If the fuel level in the tank is low the hand vacuum must be operated at least 20 … 30 times.
If vacuum builds up:
–  Replace fuel tank cap.
  E20-0064

Removing and installing parts of fuel supply system > < Electronic power control (EPC) (electronic accelerator)