seat Workshop Repair Guides

SEAT Workshop Service and Repair Manuals

Valve gear: repairing > < Cylinder block, crankshaft and flywheel: removing and installing
Fitting
Fitting
  Note!
t  Only remove the new cylinder head gasket from its packing right before installing.
t  Handle the new gasket with extreme care. If it is damaged, leaks could result.
–  Using clean cloths stop up the cylinders to prevent dirt or filings from getting between the cylinder wall and the piston.
–  Also prevent dirt and filings from getting into the coolant.
–  Carefully clean cylinder head and cylinder block sealing surfaces. Pay attention not to produce any scoring or scratches (when using abrasive paper the grade must not be less than 100).
–  Carefully remove filings and cloths.
–  Set No. 1 cylinder piston to TDC and then turn crankshaft back slightly.
   
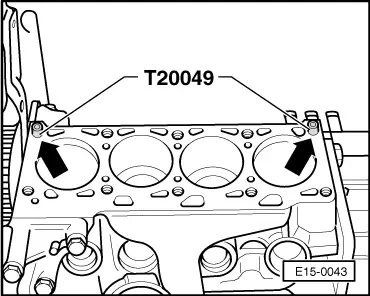
–  To centre, place guiding centralisers -T20049- into rear outer holes designated for the cylinder head's securing bolts -arrows-.
–  Place the new cylinder head gasket. Lettering (Part No.) must be readable.
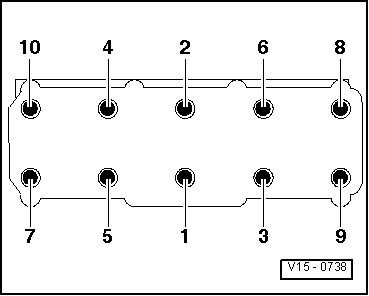
–  Fit cylinder head, screw in 8 remaining cylinder head bolts and tighten by hand.
–  Separate the guiding centralisers using tool -T20049-. To do this, turn the tool toward the left until the pins are removed.
–  Fit the remaining two cylinder head bolts, also tightening them manually.
  E15-0043
–  Tighten the cylinder head bolts in four stages, according to the established order, as follows:
–  Previously tighten all bolts to 40 Nm.
–  Then tighten all bolts to 60 Nm.
–  Then tighten all bolts a 1/4 turn (90°) further using a rigid wrench.
–  Finally, retighten all bolts again a 1/4 turn (90°) further.
The rest of the assembly is basically the reverse of the dismantling sequence.
Installing toothed belt and adjusting valve timing → Chapter.
Filling with new coolant → Chapter.
  V15-0738

Valve gear: repairing > < Cylinder block, crankshaft and flywheel: removing and installing