seat Workshop Repair Guides

SEAT Workshop Service and Repair Manuals

Dismantling and assembling pistons and conrods > < Removing and installing ribbed belt
Checking semi-automatic toothed belt tensioning roller
Special tools and workshop equipment required
   
t  Torque wrench -SAT 8010-
  W00-2760
t  -U-30025- or Support beam -10222A- with -10-222A/1-
Test sequence
The engine must be lowered slightly as follows to enable the crankshaft sprocket to be removed:
–  Remove air cleaner: → Chapter
  W00-2976
–  Fit support -U-30025- as shown.
–  Take-up weight of engine, and remove right engine mounting.
–  Lower engine slightly.
–  Remove ribbed belt → Chapter.
–  Remove belt pulley as well as upper and lower toothed belt guard.
–  Now turn the crankshaft two turns in engine direction of rotation until it is again at top dead centre No. 1 cylinder.
  E13-0136
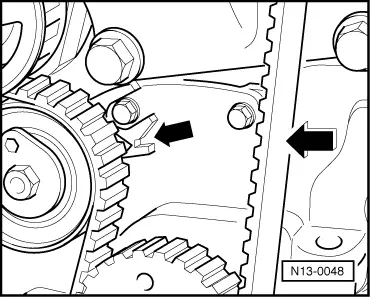
–  Note the position of the tensioning roller indicator -arrow-. Press the toothed belt with firm thumb pressure. The indicator must move.
–  Release tension on toothed belt.
–  Turn crankshaft two turns in engine direction of rotation.
–  Then check the position of the indicator. It must have returned to its original position.
If tensioning roller does not return to initial position:
–  Replace tensioning roller.
If the tensioning roller is OK:
–  Reinstall belt pulley and toothed belt guard upper and lower parts.
–  Refit right engine mounting with new bolts → Chapter, Engine assembly mounting.
–  Refit the ribbed belt and the cover.
  Note!
When installing the ribbed belt ensure that it sits correctly in the pulleys.
The rest of the assembly is basically a reverse of the dismantling sequence.
  N13-0048

Dismantling and assembling pistons and conrods > < Removing and installing ribbed belt