Leon Mk1
| Part I |

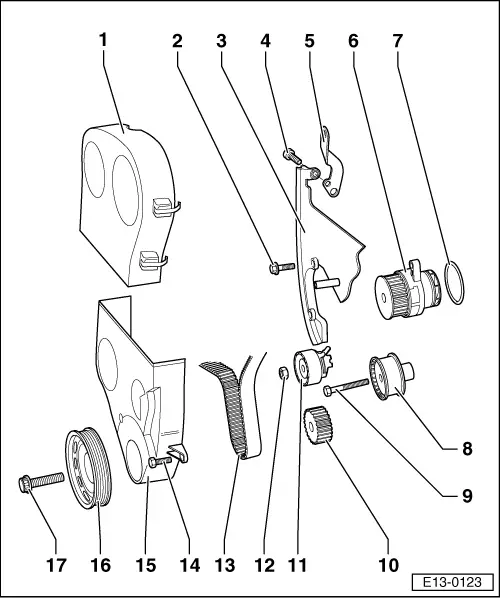
| 1 - | Toothed belt guard, upper part |
| 2 - | Bolt |
| q | 10 Nm |
| 3 - | Toothed belt guard, rear |
| 4 - | Bolt |
| q | 20 Nm |
| 5 - | Lifting eye |
| 6 - | Coolant pump |
| 7 - | O-ring |
| q | Renew |
| 8 - | Idler wheel |
| 9 - | Bolt |
| q | 20 Nm |
| 10 - | Toothed belt sprocket, crankshaft |
| q | Note position when installing toothed belt → Chapter |
| 11 - | Tensioning roller |
| q | Checking → Chapter |
| q | Tensioning toothed belt → Chapter |
| 12 - | Bolt |
| q | 20 Nm |
| 13 - | Toothed belt |
| q | Mark direction of rotation (DOR) before removing |
| q | Check for wear |
| q | Do not kink |
| q | Toothed belt routing → Fig. |
| q | Removing, installing and tensioning → Chapter |
| 14 - | Bolt |
| q | 10 Nm |
| 15 - | Toothed belt guard, lower part |
| 16 - | Belt pulley |
| q | Note fixings when installing |
| q | Removing and installing → Chapter; Removing, installing and tensioning toothed belt |
| q | Removing and installing ribbed belt → Chapter |
| 17 - | Bolt |
| q | 90 Nm + 1/4 turn (90°) further |
| q | Renew |
| q | Insert oiled |
| q | The turning further can be completed in many stages |
| q | The turning further angle can be measured with protractor -T20030- |
