seat Workshop Repair Guides

SEAT Workshop Service and Repair Manuals

Engine control unit > < Supercharge system with turbocharger: repairing
Removing and installing Lambda probeG39 with Lambda probe heaterZ19
Removing and installing Lambda probe -G39- with Lambda probe heater -Z19-
t  Removing → Anchor
t  Fitting → Anchor
Consult the equivalence table for tools and equipment according to applicability among Seat / VW / Audi / Skoda → Chapter.
Special tools and workshop equipment required
   
t  Socket wrench 22 mm -T20202A-, see equivalent → Anchor
  L26-10001
t  Torque wrench -VAG 1331-, see equivalent → Anchor.
  W00-0427
Removing
–  Loosen the engine cover at the locations -arrows- and remove.
  E10-10087
–  Disconnect electrical connection -4- for lambda probe -G39-.
–  Free the cable of the Lambda probe -G39- from its attachment.
  N26-10416
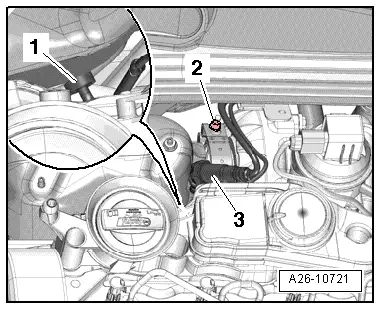
–  Unscrew lambda probe -G39--3- with SW 22 socket wrench -T20202A-.
Installing
Carry out the assembly operations in reverse order to those described for the disassembly, taking the following into account:
  Note
t  The screw thread on the new lambda probe is coated with a special paste; the paste must not get into the slots on the probe body.
t  With a used lambda probe, heat the bolt before coating only the thread with paste → Spare parts catalogue The paste must not get into the slots on the probe body.
t  When installing, the Lambda probe wiring must always be re-attached at the same locations to prevent it from coming into contact with the exhaust pipe.
l  Specified torque → Chapter „Assembly overview - front exhaust pipe with particulate filter“.
  A26-10721

Engine control unit > < Supercharge system with turbocharger: repairing