Leon Mk1
| Assembly overview - poly V-belt drive |

| 1 - | poly V-belt |
| q | Mark direction of rotation before removing. |
| q | Check for wear. |
| q | Do not kink. |
| q | Removing and installing → Chapter. |
| 2 - | 10 Nm + 1/4 turn (90°) further |
| 3 - | Belt pulley and vibration damper |
| q | Can only be installed in one position. Holes are offset. |
| 4 - | 25 Nm |
| 5 - | Tensioning element for poly V-belt |
| q | Swing with open jaw spanner to slacken poly V-belt → Chapter. |
| 6 - | Alternator |
| q | Removing and installing: → Electrical system; Rep. Gr.27 |
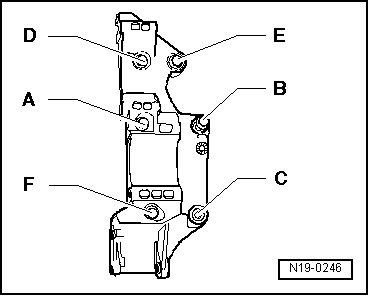
| 7 - | Compact bracket |
| q | For alternator, power steering vane pump and air conditioner compressor |
| 8 - | 45 Nm |
| q | Observe tightening sequence → Fig. |
| 9 - | Banjo bolt, 30 Nm |
| 10 - | Seal |
| q | Renew |
| 11 - | Pressure line |
| 12 - | Vane pump |
| q | For power steering |
| q | Removing and installing → Rep. Gr.48. |
| 13 - | Pulley |
| q | For vane pump |