
Leon Mk1
|
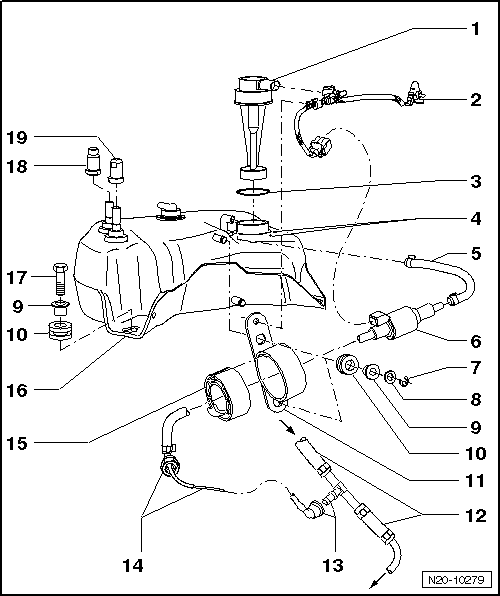
| 1 - | Fuel additive tank sender -G504-, 25 Nm |
| q | Note installation position on additive tank |
| q | Connector must be between marks → Item on additive tank |
| 2 - | Wiring harness |
| 3 - | Seal |
| q | Renew if damaged. |
| 4 - | Markings |
| q | For installation position of fuel additive tank sender -G504- |
| 5 - | Connecting hose |
| 6 - | Particulate filter additive pump -V135- |
| 7 - | Securing clip |
| 8 - | Shim |
| 9 - | Spacer |
| 10 - | Rubber mounting |
| 11 - | Bracket |
| q | For particulate filter additive pump -V135- |
| 12 - | Return line |
| q | Green. |
| q | From fuel cooler to fuel delivery unit. |
| 13 - | Connection |
| q | Ensure that additive supply line is securely seated. |
| q | When disconnecting wrap a cloth around connection and press in circlip on connecting piece. |
| 14 - | Connection |
| q | Ensure that additive supply line is securely seated. |
| q | Separate to remove the additive tank. |
| q | When disconnecting wrap a cloth around connection and press in circlip on connecting piece. |
| 15 - | Rubber mounting |
| q | For particulate filter additive pump -V135- |
| q | Ensure correctly fitted in bracket. |
| 16 - | Additive tank |
| q | Removing and installing → Chapter. |
| 17 - | 20 Nm |
| 18 - | Plug |
| q | For additive tank extraction. |
| q | Check for secure seating. |
| q | To pull off, press in securing ring on connecting piece. |
| q | Before opening first pull out additive tank sealing plug → Item. |
| 19 - | Plug |
| q | For additive tank breather |
| q | Check for secure seating. |
| q | To pull off, press in securing ring on connecting piece. |