
Leon Mk1
| Valve control: component overview |
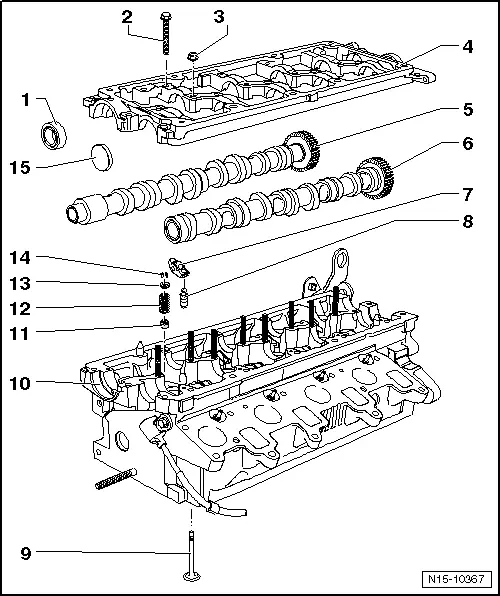
| 1 - | Seal |
| q | Do not grease or oil the seal lip of the seal |
| q | Before installing, remove residual oil from camshaft journal using a clean cloth. |
| q | To install, tape over (e.g. using Sellotape) groove in taper of camshaft |
| q | Removing and installing → Chapter. |
| 2 - | 10 Nm |
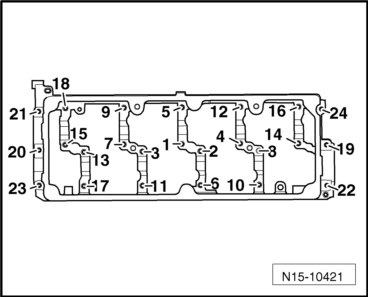
| q | Loosen following the indicated sequence → Fig. |
| q | Note correct sequence when tightening → Fig. |
| 3 - | 10 Nm |
| 4 - | Retaining frame |
| q | With integrated camshaft bearings. |
| q | Loosen following the indicated sequence → Fig. |
| q | Note correct sequence when tightening → Fig. |
| q | Clean sealing surface; machining not permitted |
| 5 - | Exhaust camshaft |
| q | Removing and installing → Chapter. |
| 6 - | Inlet camshaft |
| q | Removing and installing → Chapter. |
| 7 - | Roller rocker finger |
| q | Mark installation position. |
| q | Do not exchange position |
| q | Check roller bearing for ease of movement. |
| q | Oil contact surfaces. |
| 8 - | Hydraulic compensation element |
| q | Mark installation position. |
| q | Lubricate contact surfaces before installing. |
| 9 - | Valve |
| q | Do not rework, only lapping-in is permitted. |
| q | Mark installation position for re-installation. |
| q | Valve dimensions → Chapter. |
| q | Checking valve guides → Chapter. |
| 10 - | Cylinder head |
| 11 - | Valve stem seal |
| q | Removing and installing → Chapter. |
| 12 - | Valve spring |
| 13 - | Valve spring plate |
| 14 - | Cotters |
| 15 - | Cap |
| q | Renew |
|
|