seat Workshop Repair Guides

SEAT Workshop Service and Repair Manuals

Accelerator control: disassembly and assembly > < Engine: disassembly and assembly
Removing
Removing
  Note!
To carry out this work it is necessary to disconnect battery earth strap. The vehicle should be checked for a fitted radio. If necessary, obtain the anti-theft code for the radio first.
–  Remove the air filter assembly.
   
–  Unclip the hooks -1- from the upper protective cover of the notched belt.
–  Remove the screw -2- and remove the upper protective cover from the notched belt.
–  Remove the Poly-V ribbed belt → Chapter.
–  Separate the tensioning pulley for the Poly-V belt.
–  Separate the oil sump ventilation tubes from the attachment to the intake manifold and the sump breather.
–  Remove the cylinder head cover and the gasket.
–  Remove the liquid coolant pump pulley by securing it with the -T20159- tool.
  N02-0324
–  Remove the pulley/vibration damper from the crankshaft using the -T20018A- tool.
–  Remove the lower protection cover of the notched belt.
–  Remove the screw cap from the gearbox using the -U-20020- tool.
  E13-0016
–  Turn the crankshaft to the TDC position of cylinder 1 and check that the mark on the engine flywheel coincides with the mark made on the clutch housing -arrow-.
  E01-0162
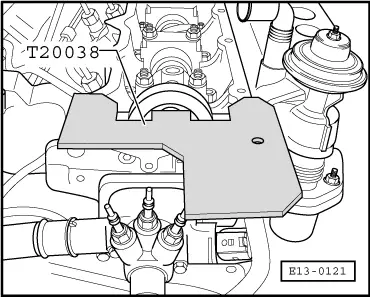
–  Immobilise the camshaft using the adjustment tool -T20038-.
Centre the adjustment tool in the following way:
–  Turn the camshaft until one end of the adjustment tool reaches the limit of the cylinder head. Using a thickness gauge, measure the existing play on the opposite end of the ruler. Turn the camshaft until the play measured previously had been divided equally between the two ends of the adjustment gauge.
  E13-0121
–  Immobilise the wheel of the injection pump using the -T20102- tool.
–  Loosen the tensioning pulley.
–  Mark D.O.R. of notched belt.
–  Remove notched belt.
  E23-0038

Accelerator control: disassembly and assembly > < Engine: disassembly and assembly