seat Workshop Repair Guides

SEAT Workshop Service and Repair Manuals

Tightening torques > < Removing: instructions
Fitting: details
Fitting: details
Carry out the aforementioned removal operations in reverse order, taking into account the following:
–  Check the wear of the disengagement collar and, if necessary, renew it.
–  Using -G 000 100-, lightly grease the disengagement collar, the collar guide hose, and the primary shaft spline.
–  Check whether the drivetrain centring bushings are aligned, and if necessary align them.
–  While installing the drivetrain, make sure the prop shafts have freedom of movement.
–  Align the engine using shaking movements so that the supports rest without being under strain; if necessary, loosen the engine supports from the bodywork as well
   
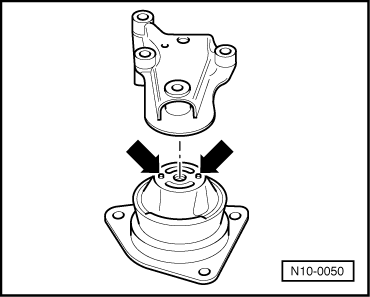
–  When fitting the engine supports, special attention must be paid so that the projections on the metal-rubber bearings sink into the engine supports -arrows-.
  Note!
First insert the drivetrain bolt on the engine side, and then lift the drivetrain assembly slightly on the gearbox side and insert the remaining bolt.
–  Install the power assisted steering vane pump: → Running gear; Rep. Gr.48
–  Install the air conditioner compressor: → Heating, air conditioner; Rep. Gr.87
–  Install the prop shafts: → Running gear; Rep. Gr.40
–  Install the lock support along with the subsequently fitted elements: → Bodywork-fitting work; Rep. Gr.50
–  Install the clutch control cable: → 5-speed manual gearbox 002; Rep. Gr.30
–  Install the gearbox shift control: → 5-speed manual gearbox 002; Rep. Gr.34
–  Renew the pointed screw that fastens the shift finger (clean the threads on the shift finger).
–  Install the front exhaust pipe → Anchor, Exhaust manifold, front exhaust pipe with catalyst and accessory parts.
–  Electrical connections and wiring layout: → Electrical system; Rep. Gr.97
–  Re-secure all cables and flexible hoses with cable holders and clips, paying attention to the coloured markings.
–  Load coolant → Chapter.
–  Adjust the accelerator cable → Chapter.
–  Fit the control unit to the engine's electronics: → Chapter → Chapter
–  Carry out a road test and check the fault memory: → Vehicle diagnosis, testing and information system VAS 5051
  N10-0050

Tightening torques > < Removing: instructions