seat Workshop Repair Guides

SEAT Workshop Service and Repair Manuals

Fitting: details > < Engine: Removing and installing
Removing: instructions
  Note!
In order to carry out these operations, it is necessary to disconnect the earth strap. Because of this, check whether the vehicle has a coded radio installed, and if so, check the anti-theft coding.
–  The engine is removed forwards together with the gearbox.
–  With the ignition switched off, disconnect the earth strap from the battery and remove the battery.
  Note!
All cable holders that were loosened or cut while removing the engine, must be installed in the same place as before when installing the engine.
   
–  Remove sealing cap -1- and loosen securing nut -2- for engine cover.
–  Remove engine cover and close filler plug drilling with the cap -3- that is on the lower part of the cover.
  N10-0185
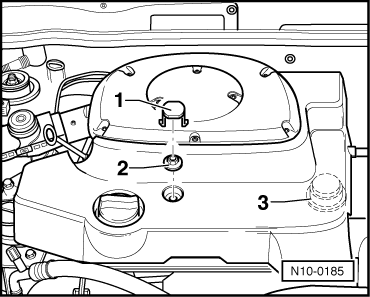
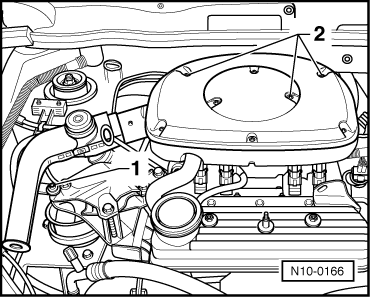
–  Remove air filter. To do so, loosen the securing screw -1- (tightening torque 8 Nm).
–  Loosen the screws -2- on the top side of the air filter.
  Note!
t  When loosening or tightening the securing screws with an electric/pneumatic screwdriver, the threads in the intake tube may be damaged. Therefore, only use an electric/pneumatic screwdriver under the following conditions:
t  Maximum screwdriver revoloutions, 200/min
t  Maximum tightening torque of 3 Nm
–  Remove the fuel supply hose by the connection next to the suspension turret and the return hose by the fuel distributor.
  Caution
The fuel supply hose is under pressure. Before opening the system, place a cloth around the point of connection. Next, eliminate the pressure by carefully separating the connection.
–  Plug the hoses to prevent grime from entering the fuel system.
–  Remove all electrical cables from gearbox, alternator and starter motor, and leave them in the open.
–  Drain the coolant → Chapter.
–  Remove from the engine the accelerator cable, flexible connection hoses, coolant hoses, and vacuum and intake hoses.
–  Remove the connector from the temperature switch and from the radiator cooling fan.
–  Disconnect all necessary electrical cables from the engine and leave them in the open.
–  Remove the front exhaust pipe from the exhaust manifold → Anchor, exhaust manifold, front exhaust pipe with catalyst and accessory parts.
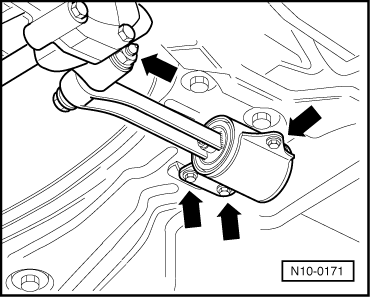
–  Remove the the prop shafts from the gearbox and fasten them to the bodywork.
  N10-0166
–  Remove the pendular support arm -arrows-.
–  Remove the gear shift actuator from the gearbox: → 5-speed manual gearbox 002; Rep. Gr.34
–  Unhook the clutch control cable: → 5-speed manual gearbox 002; Rep. Gr.30
Vehicles with air conditioner
–  Observe the additional indications and fitting work → Chapter.
Continued for all vehicles
–  Remove the power steering fluid reservoir and place it on its side.
–  Remove the lock support and subsequently fitted elements: → Bodywork-fitting work; Rep. Gr.50
–  Remove the ribbed belt → Chapter.
–  Remove the screws that secure the P.A.S. vane pump and fasten it to the engine support or to the engine unit carrier; the flexible hoses remain connected: → Running Gear; Rep. Gr.48
  N10-0171
–  Attach suspension device -U-30034- as shown and lift slightly using the workshop derrick.
  E10-0037
–  Loosen the screws that secure the drivetrain to the engine and gearbox supports (it is only necessary to remove the 2 screws that secure the supports to the metal-rubber bearings).
–  Lower the drivetrain until it is out of the gearbox housing.
–  Withdraw the drivetrain by pulling it forward while turning it.
  Note!
The drivetrain should be steered very carefully while being withdrawn from the vehicle, in order to avoid damage to the bodywork.
–  In order to carry out fitting work, the engine should be secured to the fitting trestle using engine support -Ar-2204A-, together with clamps -T20082-.
  N10-0184

Fitting: details > < Engine: Removing and installing