Leon Mk1
| Assembly overview - poly V-belt drive |

| 1 - | Poly-V belt |
| q | Check for wear |
| q | Before removing, mark direction of rotation with chalk or felt-tip pen. If the belt runs in the opposite direction when it is refitted, this can cause breakage. |
| q | Removing and installing → Chapter. |
| q | When fitting the belt, ensure that it is correctly seated on the pulleys. |
| 2 - | Belt pulley and vibration damper |
| q | Can only be fitted in one position |
| q | Removing and installing → Chapter. |
| 3 - | Cover cap for vibration damper |
| 4 - | 10 Nm 90° (1/4 turn) |
| q | Replace |
| 5 - | 25 Nm |
| 6 - | Vane pump pulley |
| 7 - | Poly V-belt tensioning element |
| q | To stop, use locking tool -T40098-. |
| q | Removing and installing → Chapter. |
| 8 - | Bracket for ancillary mechanical units |
| q | Removing and installing → Chapter. |
| 9 - | 23 Nm |
| 10 - | Alternator |
| 11 - | 23 Nm. |
| 12 - | Vane pump |
| 13 - | 45 Nm. |
| 14 - | Through sleeve |
| q | Make sure the cylinder head supports are correctly seated |
| 15 - | Air conditioning compressor |
| q | Do not unscrew or loosen the refrigerant lines |
| q | Removing and installing → Rep. gr.87. |
| q | Pay attention to dowel sleeves → Item when installing |
| 16 - | 23 Nm. |
| 17 - | 25 Nm. |
| q | Tightening torque on rear mounting bolt for vane pump: 20 Nm |
| 18 - | Idler roller for poly V-belt |
| q | Note the location |
| 19 - | 20 Nm 90° (1/4 turn) |
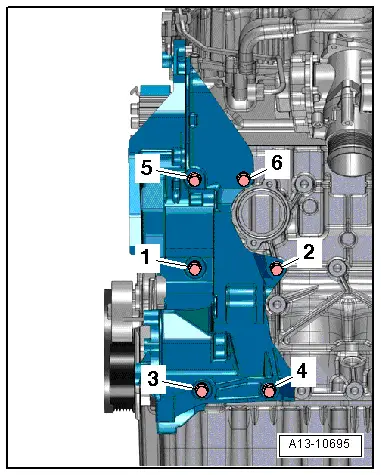
| stage: | Bolts | Tightening torque/angle specification |
| 1. | -1 … 6- | Screw in bolts by hand until they make contact |
| 2. | -1 … 6- | 40 Nm. |
| 3. | -1- and -2- | turn 60° further |
| 4. | -3- and -4- | turn 180° further |
| 5. | -5- and -6- | turn 60° further |

 Note
Note